Getting Started with API Performance Testing in Robonito
APIs help different parts of an application communicate with each other. They keep your app connected and responsive. But when an API becomes slow or stops wor...

Introduction
APIs help different parts of an application communicate with each other. They keep your app connected and responsive. But when an API becomes slow or stops working under pressure, the whole system can suffer. That is why testing how your APIs perform is so important before you make them live.
API performance testing lets you see how your APIs react when many users access them at the same time. It checks how fast they respond, how stable they are, and how much load they can handle. This gives you a clear view of your system’s strength in real conditions.
Robonito makes this process simple. You can set up your API requests, run performance tests, and see detailed results — all in one place. It shows how your APIs behave under load and helps you fix slow points before users notice them.
In this document, you will learn how to test API performance in Robonito, understand the results, and make your APIs faster and more reliable for real use.
Using Swagger for API Performance Testing in Robonito
Before releasing an application, you need to know how it performs when many users use it at the same time. That is where API performance testing comes in. It checks how fast and stable your APIs are under pressure. If your API becomes slow or crashes when traffic increases, it can affect the user experience and system reliability. So, performance testing is an important part of the development process.
In Robonito, you can perform API performance testing using Swagger. For now, Robonito supports Swagger, while Postman support is being developed and will be available soon. Swagger helps you view and test all available APIs in one place. You can open it in your browser, understand how each API works, and use that information for testing.
When you use Swagger with Robonito, you can send multiple API requests automatically. This allows you to check how your APIs respond when many users are active at once. You can see the response time, spot slow APIs, and identify performance issues before users face them. In this guide, we will use cocfo.com as an example to understand how to collect and use API details for performance testing.
What Is Swagger
Swagger, also called OpenAPI, is a tool that helps you explore and understand APIs easily. It shows all API endpoints in one place, along with their methods, input data, and sample responses. You can test these APIs directly in your browser without writing any code or using another tool.
Swagger is useful for both developers and testers. Developers use it to define and share API information, while testers use it to explore and validate those APIs. It helps both teams stay on the same page and avoid confusion. With Swagger, you can clearly see how an API works, what data it needs, and what response it gives back.
For testers, Swagger becomes the first place to look before starting any type of testing — whether functional, regression, or performance testing. It gives a clear overview of all APIs and how they behave.
How APIs Appear in Swagger
The APIs you see on the Swagger page are not added manually. They appear automatically from a file that developers create. This file is called the Swagger Specification or OpenAPI Definition file. It is written in JSON or YAML format and contains structured information about every API in the project.
The file usually includes:
- Endpoint URLs, like /login or /products.
- HTTP methods, such as GET, POST, PUT, or DELETE.
- Parameters, which define what data must be passed in the request.
- Request and response formats, usually in JSON or XML.
- Response codes, such as 200 for success or 400 for bad requests
Swagger reads this file and automatically displays all the APIs in a neat and interactive layout. This helps testers understand how each API works before using them in testing tools like Robonito.
Example: Swagger for cocfo.com
Let us take an example of cocfo.com, a demo website that has features like login, product listing, cart management, and checkout. Developers define several APIs for this site, such as:
- POST /login – Logs in the user.
- GET /products – Fetches the list of available products.
- GET /cart – Shows the user’s shopping cart.
- POST /checkout – Handles payments and completes orders.
When these APIs are defined in the Swagger file, they automatically appear in the Swagger UI. You can see them grouped under categories like User, Product, or Order.
Swagger does not create new APIs. It only displays what is already implemented by developers. For testers, this makes Swagger a reliable and up-to-date reference for understanding how each API behaves.
Accessing the Swagger Page
To open Swagger for a project, you will need the Swagger URL. Usually, the development or QA team shares it with testers. It looks something like this:
https://api.cocfo.com/swagger/index.html
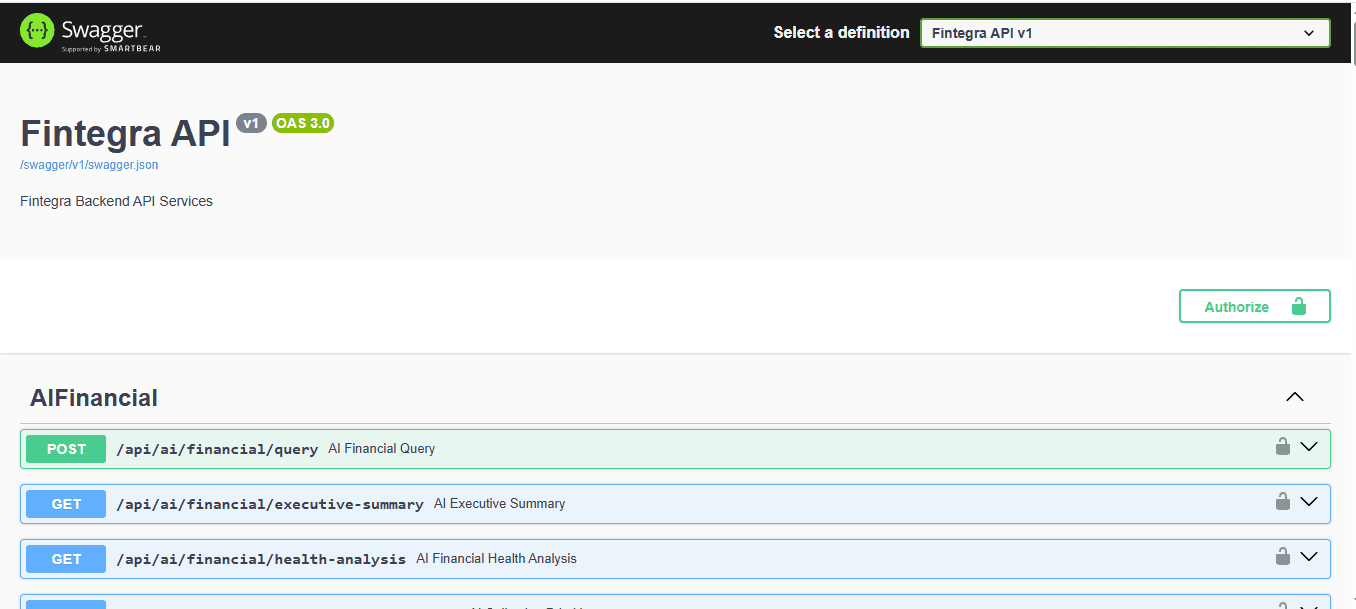
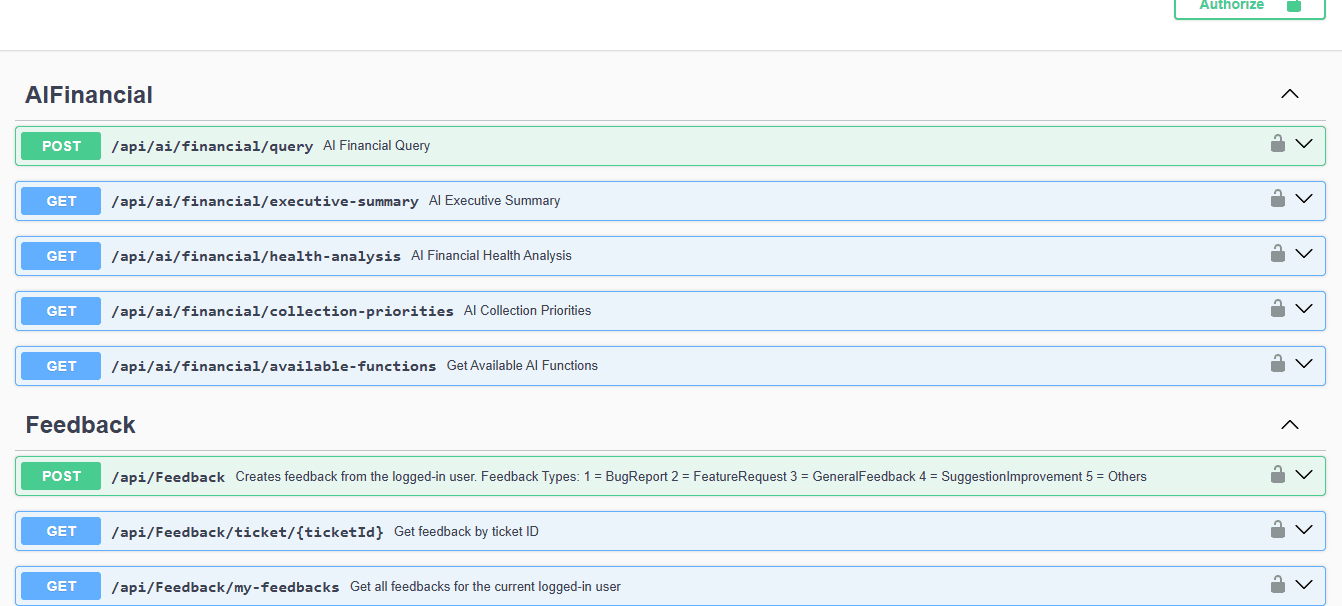
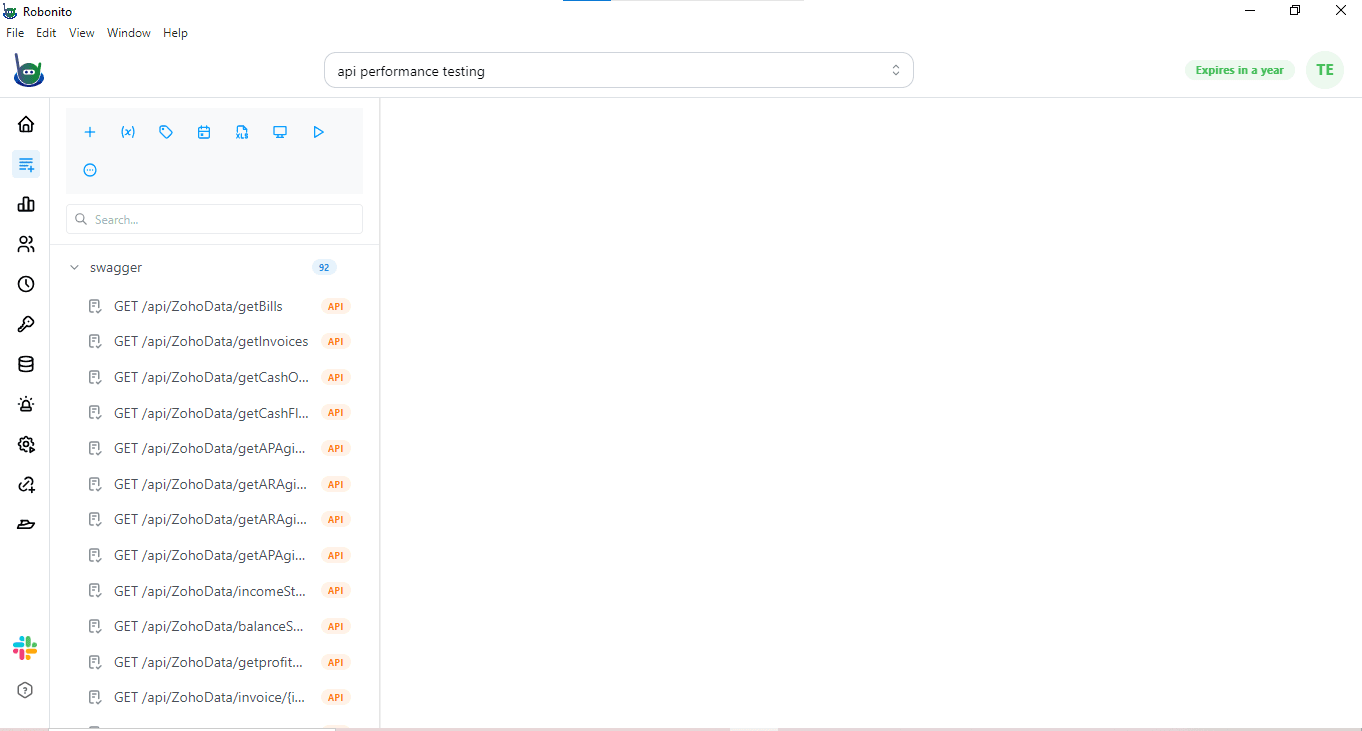
When you open this link in your browser, the Swagger UI will appear. It shows all APIs, grouped according to their function — for example, ALfinancial, Projects, or Feedback etc.
You can click on any API to expand it. Once you expand it, you will see the HTTP method, endpoint, parameters, and response format. This makes it simple to explore the API and gather the details you need for testing.
Exploring APIs in Swagger
After opening the Swagger interface, start exploring the APIs one by one. Click on any API, and you will see its complete structure. Swagger shows:
- The endpoint URL, where the request will go.
- The HTTP method, like GET, POST, or PUT.
- The parameters you must include, such as IDs or tokens.
- The** request body, **which contains input data for POST or PUT requests.
- The response section, which shows sample outputs and status codes.
These details help you understand what the API expects and what it returns. Once you know this, you can use the same details to create your performance tests in Robonito.
Using API Details for Performance Testing
When you explore APIs in Swagger, you can collect all the data required for performance testing. You need information like the endpoint, HTTP method, request body, headers, and expected response. These are the main inputs for running performance tests.
For example, open the Swagger page for cocfo.com:
https://api.cocfo.com/swagger/index.html
Here, you will find all APIs categorized properly. Click on any API, such as /login or /products, and you will see the following details:
- Endpoint URL, for example /login.
- Method, like POST.
- Parameters, such as username and password.
- Response format, usually JSON.
If you go to the Swagger JSON file —
https://api.cocfo.com/swagger/v1/swagger.json —
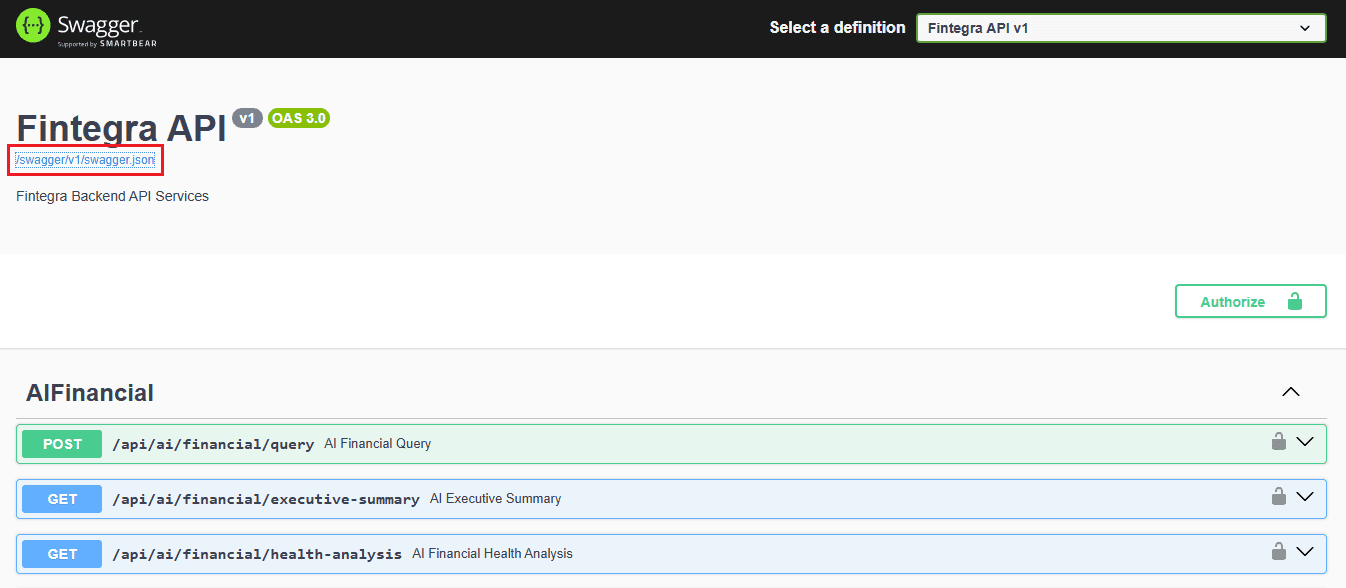
you will find all these details in one structured JSON document. This file includes every endpoint, its request type, input fields, and response models.
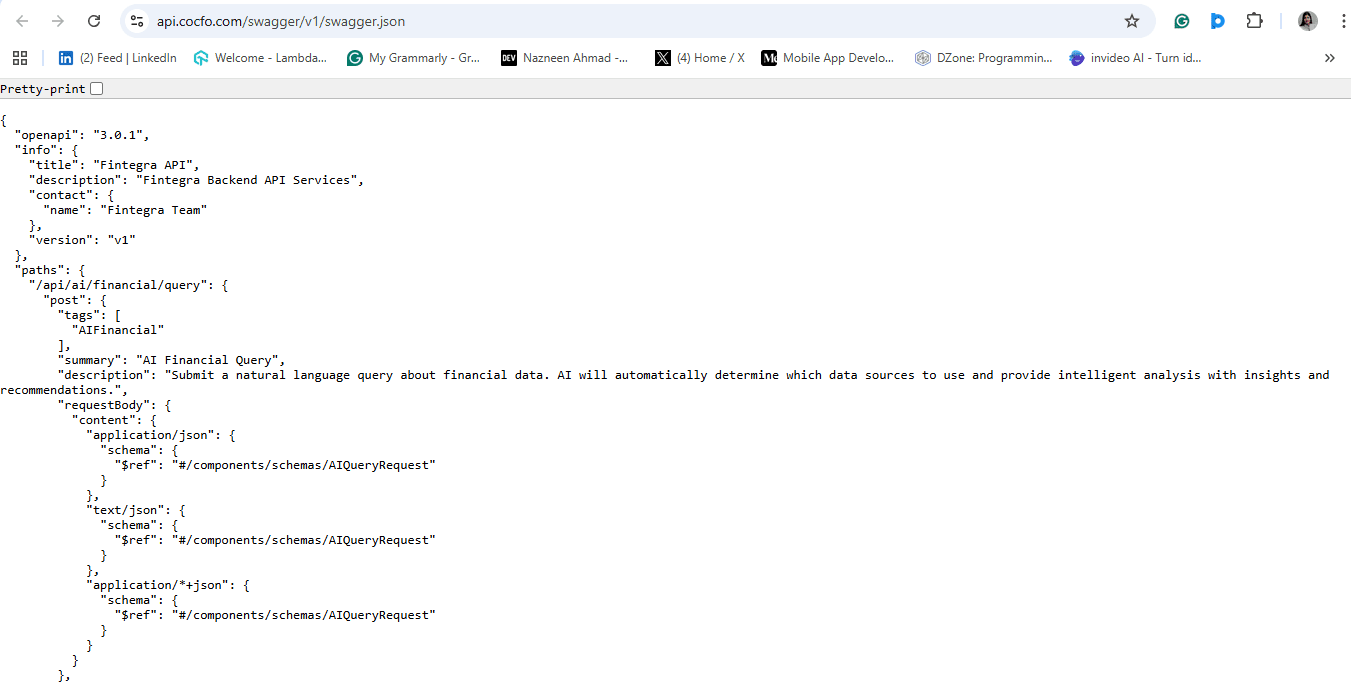
You can use this JSON link to import the APIs directly into Robonito. Just copy the Swagger URL and paste it inside the Swagger import section in Robonito. Once you import it, Robonito automatically lists all APIs defined in that file. You can then select the APIs you want to test without manually entering each one. This makes setup faster and more accurate.
Example: Testing the /login API
In this tutorial, we will take an example of testing the /login API.
After importing the Swagger file into Robonito, open the list of APIs and select /login. You will see details such as:
- Endpoint: /login
- Method: GET, POST
- Request body: User credentials like username and password.
Now imagine you want to check how this API behaves when 100 users log in at the same time. You can set this condition in Robonito’s performance test settings. Robonito will automatically send multiple login requests and record how the server responds.
After the test, you will get metrics like response time, requests per second, and failure rate. These numbers help you understand how stable and fast your API is. If there are slow responses or timeouts, you can report them to the development team for improvement.
Swagger helps a lot in this process because it provides the exact structure of the API. You do not have to guess what parameters or methods to use. It saves time, avoids confusion, and helps you prepare accurate tests.
In the next section, you will learn how to import the Swagger file into Robonito step by step. It will show how to upload the file, choose APIs, set load parameters, and run performance tests easily inside Robonito.
Importing a Swagger/OpenAPI File into Robonito
This section explains how to import APIs from a Swagger (OpenAPI) specification into Robonito so that you can create API test cases automatically. The example uses the Cocfo Swagger file located at https://api.cocfo.com/swagger/v1/swagger.json and the base URL https://api.cocfo.com/.
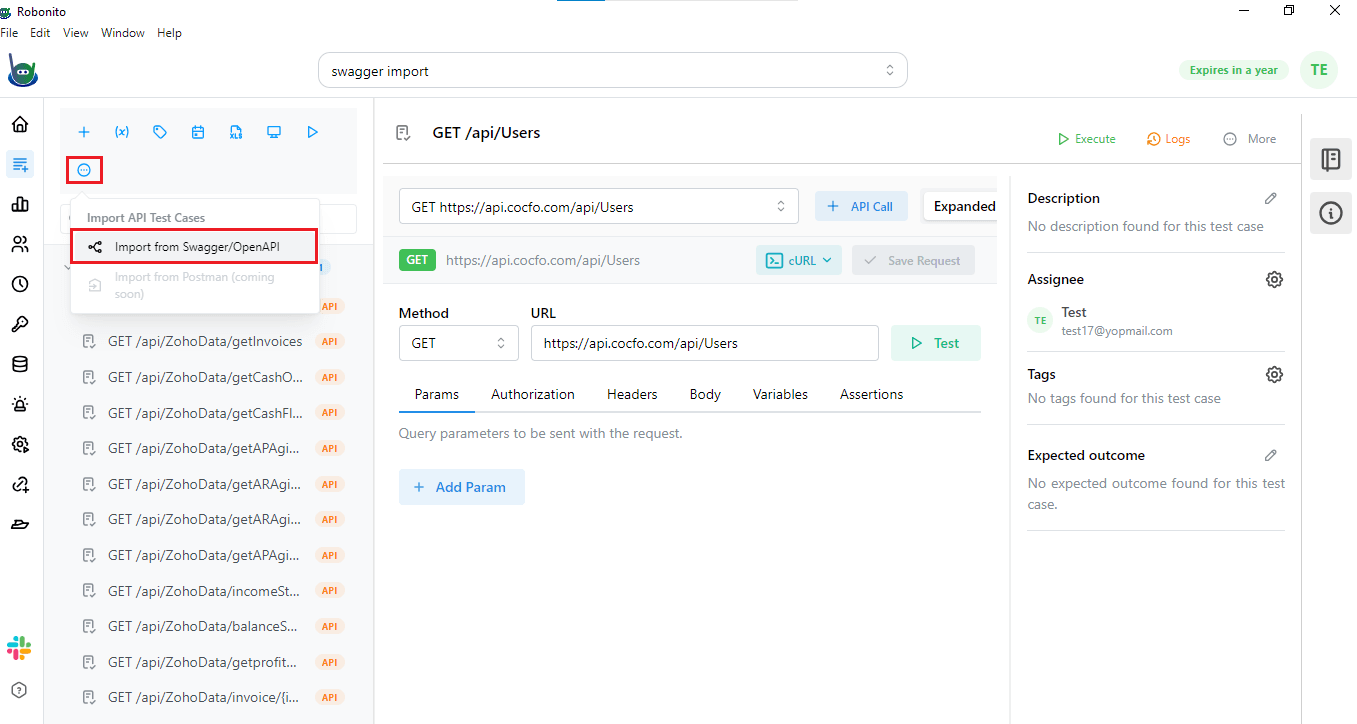
- Open the Test Explorer from the left sidebar by clicking the Test Explorer icon. The Test Explorer displays your existing test suites and test cases and provides options for creating or importing test artifacts. Or you have create a new test case under which you want import API test cases from Swagger.
- In the Test Explorer, locate the action controls and click the three-dot menu button. The menu expands and shows the option labeled Import API test case. Selecting this option begins the import workflow for Swagger/OpenAPI specifications.
- After you click Import API test case, a new dialog window opens to collect import details. This dialog asks you to choose the created test suite under which the imported test cases will be stored. You must select an existing test suite or provide a name to create a new one before continuing.
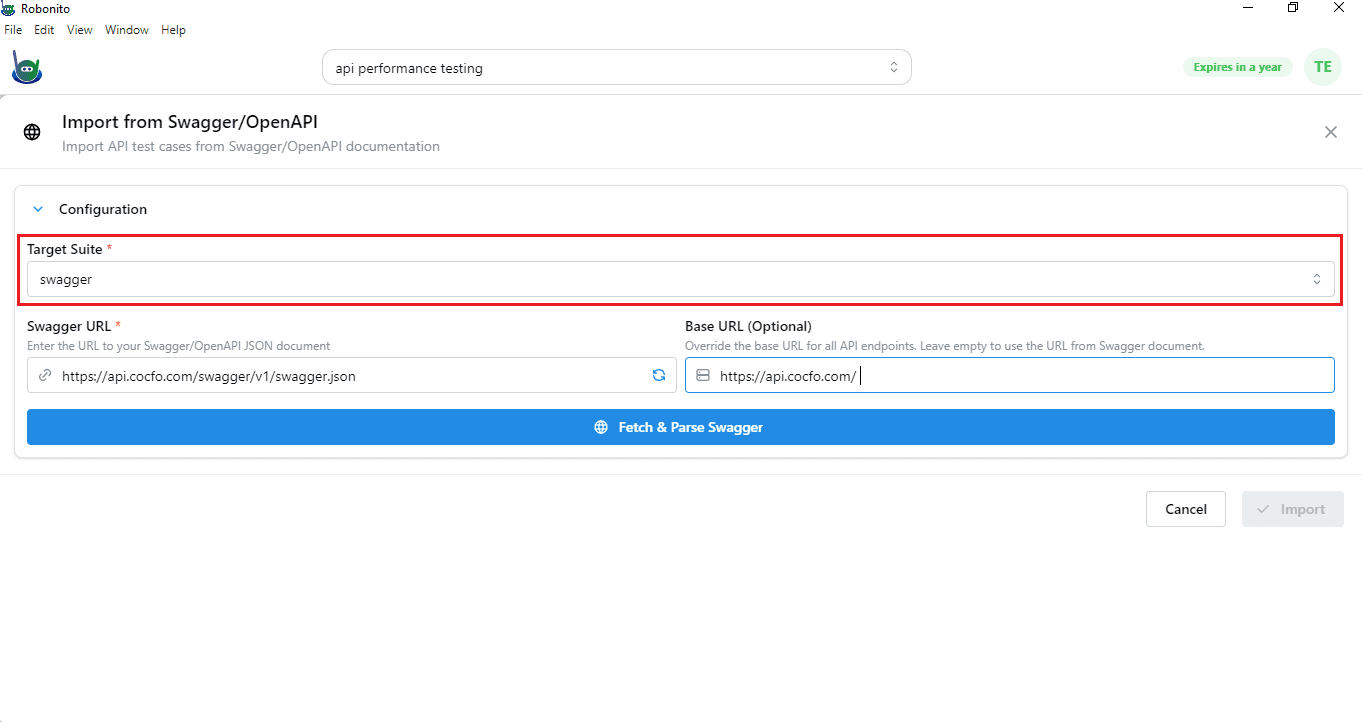
- In the same import dialog, enter the Swagger URL and the application base URL.
For this example, paste https://api.cocfo.com/swagger/v1/swagger.json into the Swagger URL field and https://api.cocfo.com/ into the Base URL field.
The Swagger URL points Robonito to the OpenAPI specification, while the Base URL specifies the root address to be used when executing the imported requests.

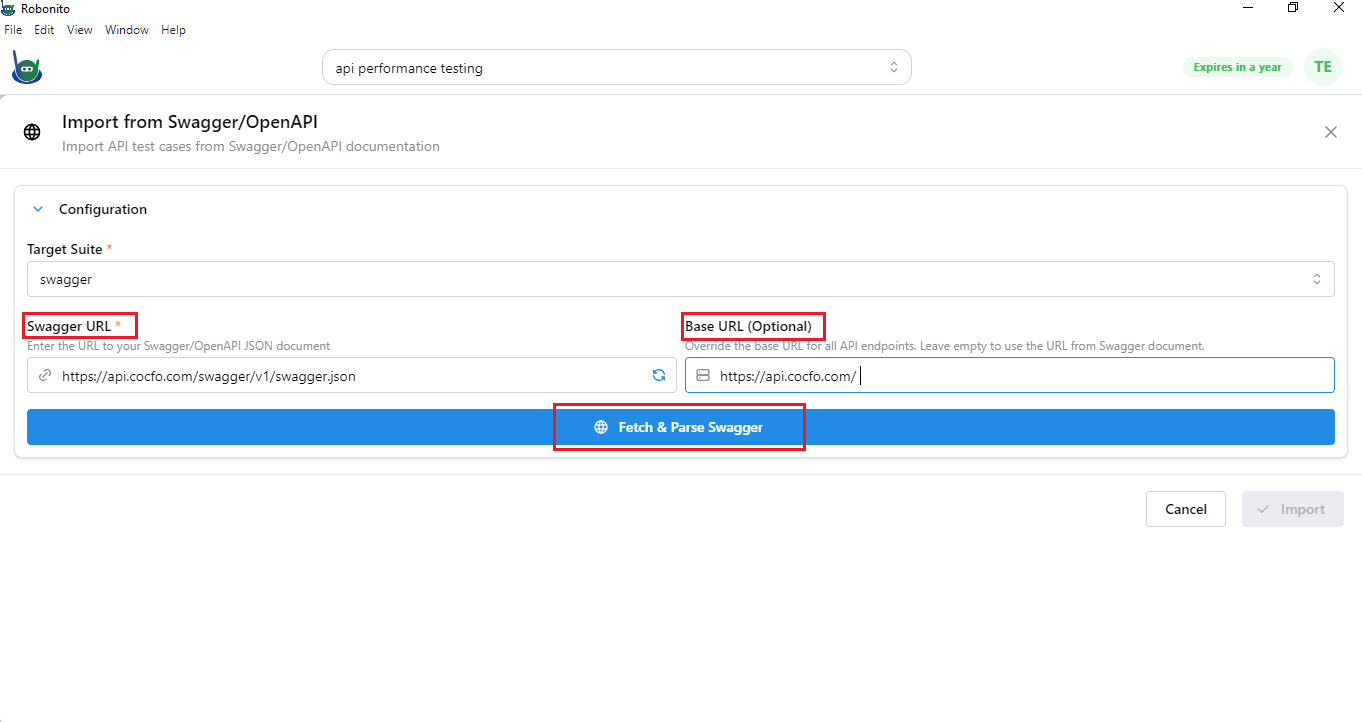
- Click the Fetch & Parse Swagger button after providing the required URLs. Robonito retrieves the JSON specification from the Swagger URL and parses the file. When parsing completes, Robonito displays a list of the APIs found in the specification, grouped by path or tag as defined in the Swagger file.
- Review the list of discovered APIs and select the endpoints you want to import. You may choose Select All to import every endpoint or select individual APIs according to your testing needs. Each listed API entry shows the endpoint path and the HTTP method so you can make an informed selection.
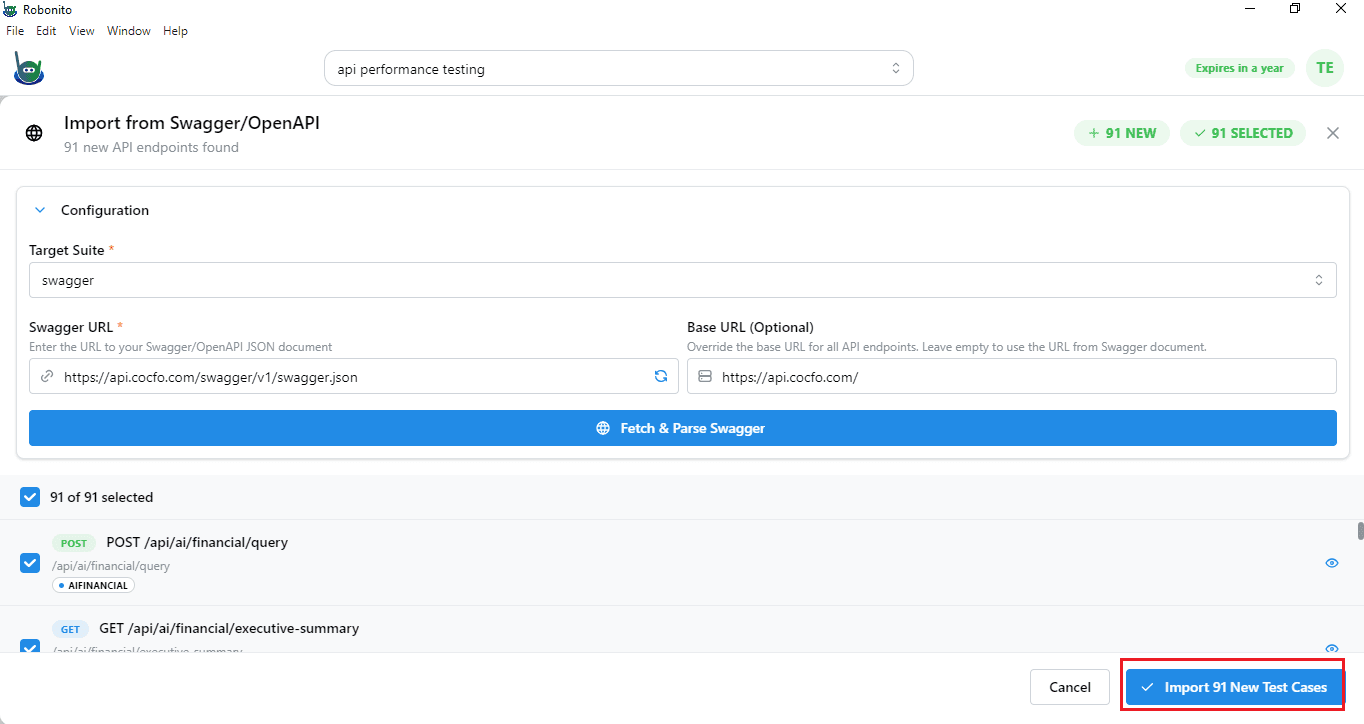
- After making your selection, click the Import new test cases button located at the bottom-right corner of the import dialog. Robonito processes your selection and creates corresponding API test cases under the chosen test suite.

- Wait for the import to complete. Within a few seconds, the new test cases appear in the Test Explorer under the selected test suite. Each imported test case contains the endpoint, method, request body schema (if any), and headers as defined in the Swagger specification.
Adding Authentication Token for API Test Cases
In this tutorial, we will perform performance testing for the website www.cocfo.com. Once all the API test cases are imported into Robonito, the next step is to add the authentication token.
Many APIs are protected and require authentication before they can be accessed. The token acts as a digital key that verifies your identity and provides permission to use the API. Without this token, your requests may be rejected with an “Unauthorized” or “Access Denied” error.
What Is a Token and Why Is It Important
A token, often called a Bearer Token or Access Token, confirms that you are an authorized user. It is generated by the server when you log in to the website. Not all APIs in a project require authentication. For example:
- Public APIs may include product listings or general information.
- Secured APIs such as login, checkout, or user profile require a token for access.
By adding the token only to the test cases that need it, you ensure that your tests are realistic and accurate, while keeping public API requests unaffected.
Steps to Obtain the Token
Log in to the website, for example, cocfo.com. The server will generate a token upon successful login.
Open the browser's developer tools:
- Right-click anywhere on the page and select Inspect.
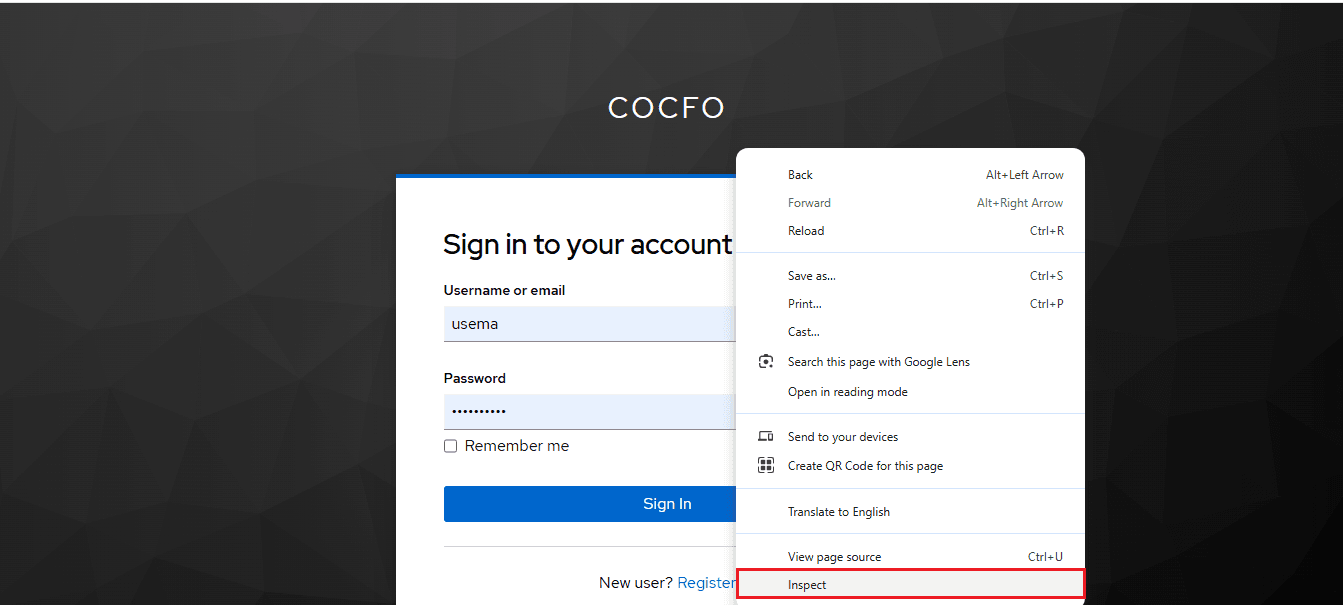
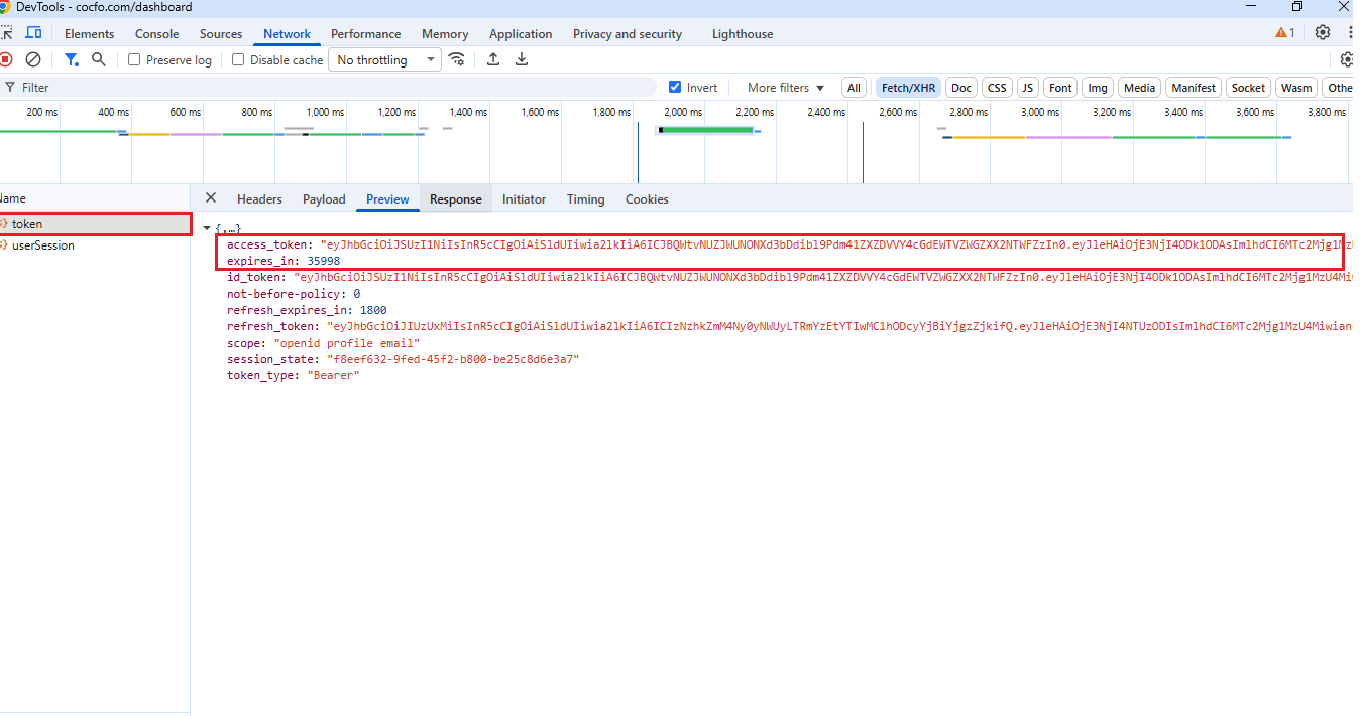
- Go to the Network tab.
In the Network tab, locate the request that contains the token. You will usually see it labeled as access token. Copy this token as you will need it for authorization in Robonito.
Adding the Token to a Specific API Test Case
Once you have the token, you can attach it to the test case that requires authentication. Follow these steps:
- Open Robonito and navigate to the Test Suite where you imported all the API test cases from Swagger.
- Scroll through the test cases and select the API test case you want to test.
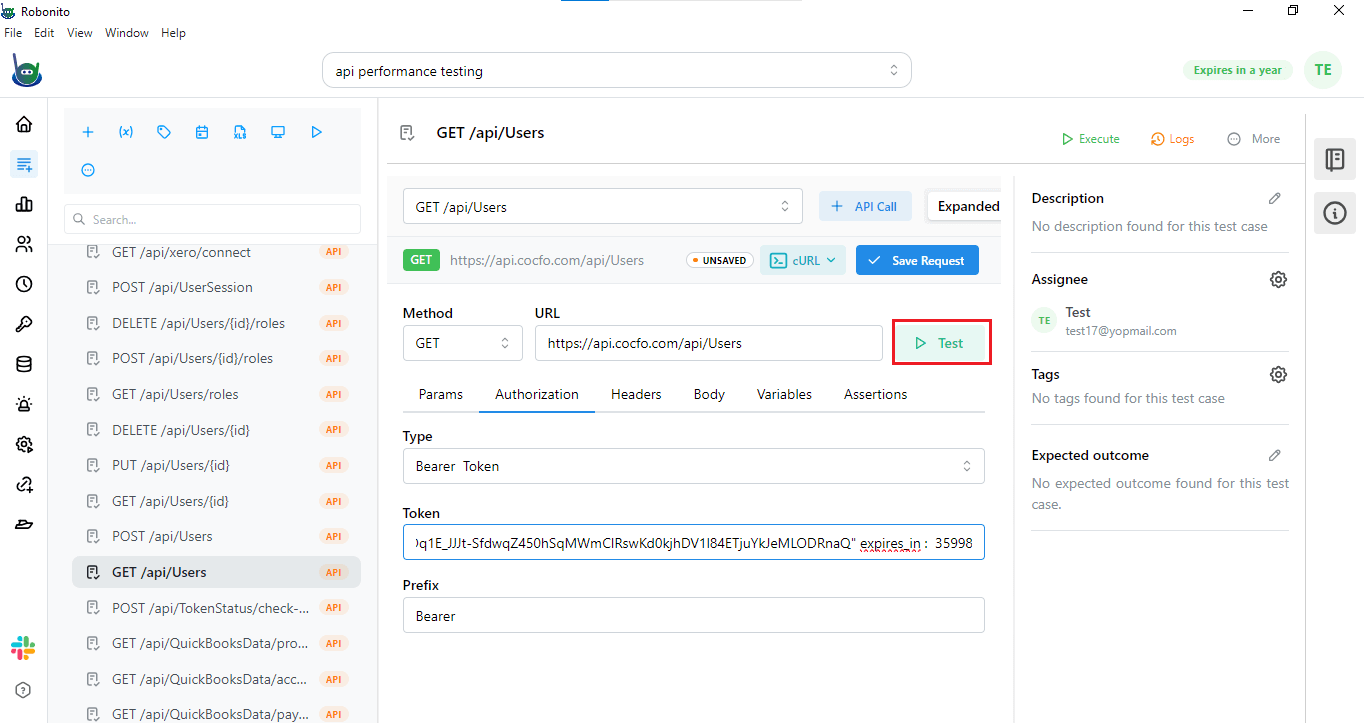
For example, choose GET /api/users. - Click on the selected test case to open the console for editing.
- Go to the Authorization section.
- In the Type dropdown menu, select Bearer Token.
- Paste the token you obtained from the website into the Token field.
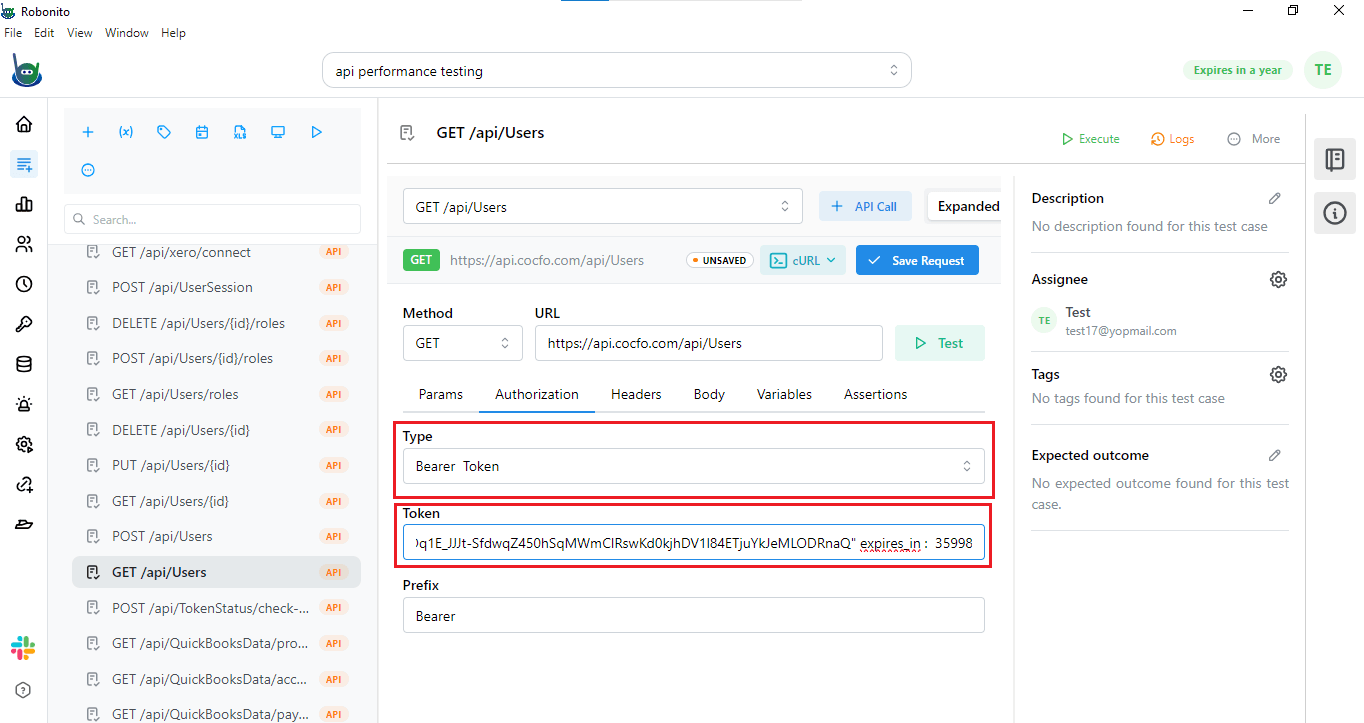
- Click Save Request to attach the token to this test case.
Finally, click Test to execute the API request with the token included.
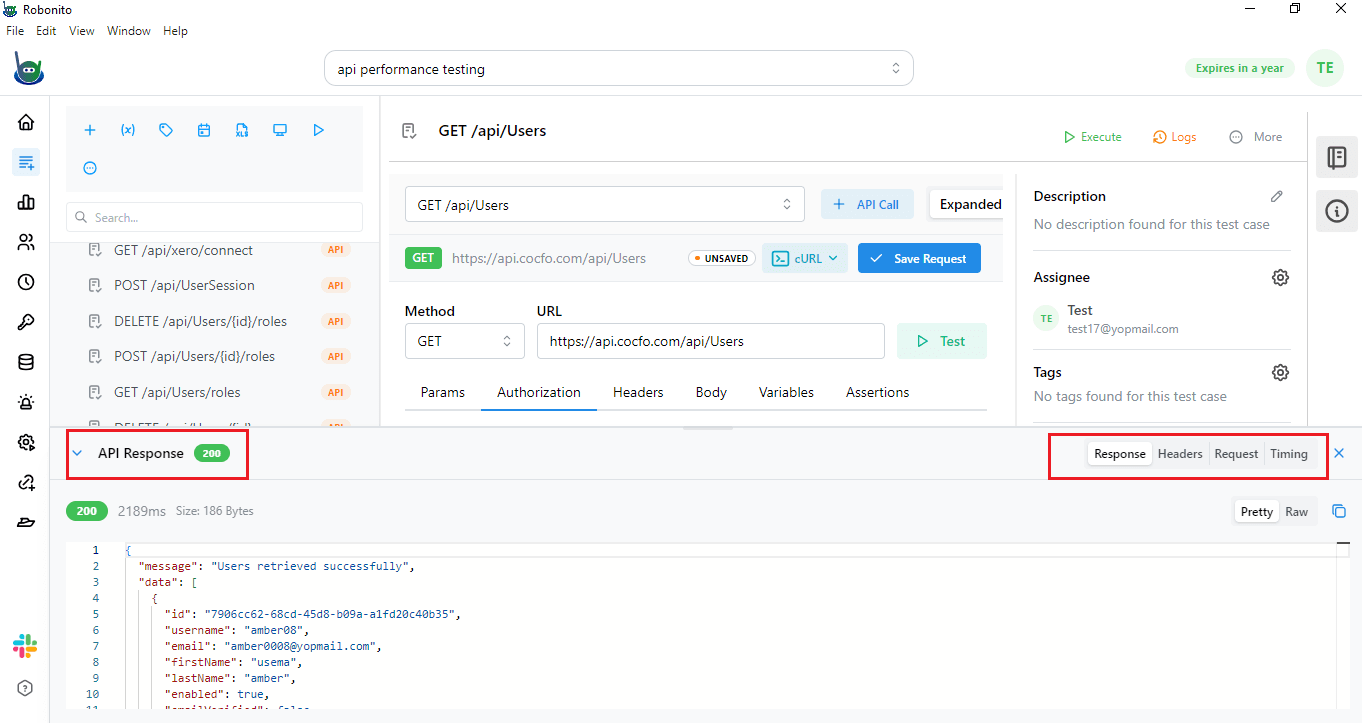
- Once the token is added, Robonito will show the API response console, which includes several important pieces of information:
- Response: Shows the data returned by the API after sending the request, like a list of users with details such as name, email, and ID.
- Header: Contains metadata about the request and response, including content type, authentication info, or server details.
- Request: Displays the details of the API call you sent, such as endpoint, method, parameters, body data, and the token.
- Timing: Shows how long the API took to respond, helping you understand its speed and performance.
Checking these details lets you verify the token, confirm the API returns correct data, and see its performance before running larger tests.
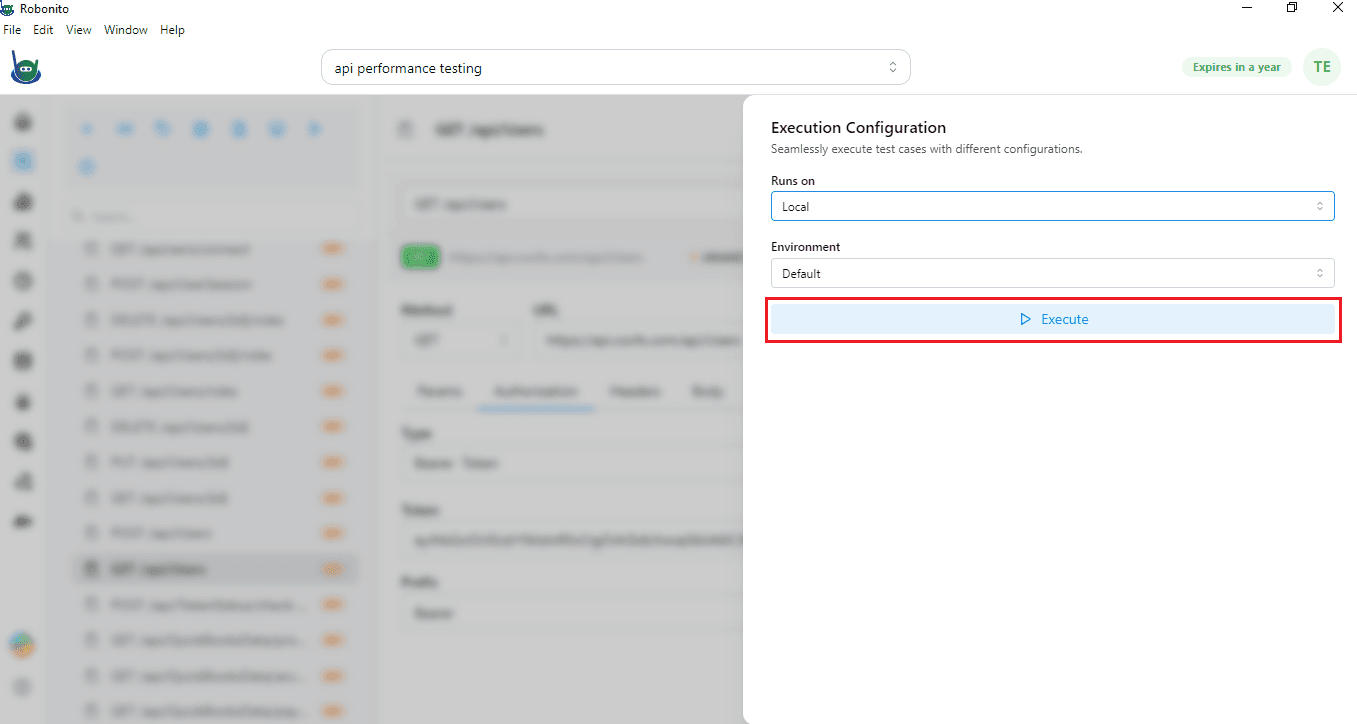
This lets you run your API performance test. You have two options: Local or Cloud.
- Local: The test runs on your own machine or network. It uses your computer’s resources to send requests and measure the API performance.
- Cloud: The test runs on remote servers in the cloud. This allows you to simulate a larger number of users from different locations without depending on your local system’s capacity.
In this example, we will run the test on Local. Click on Execute.
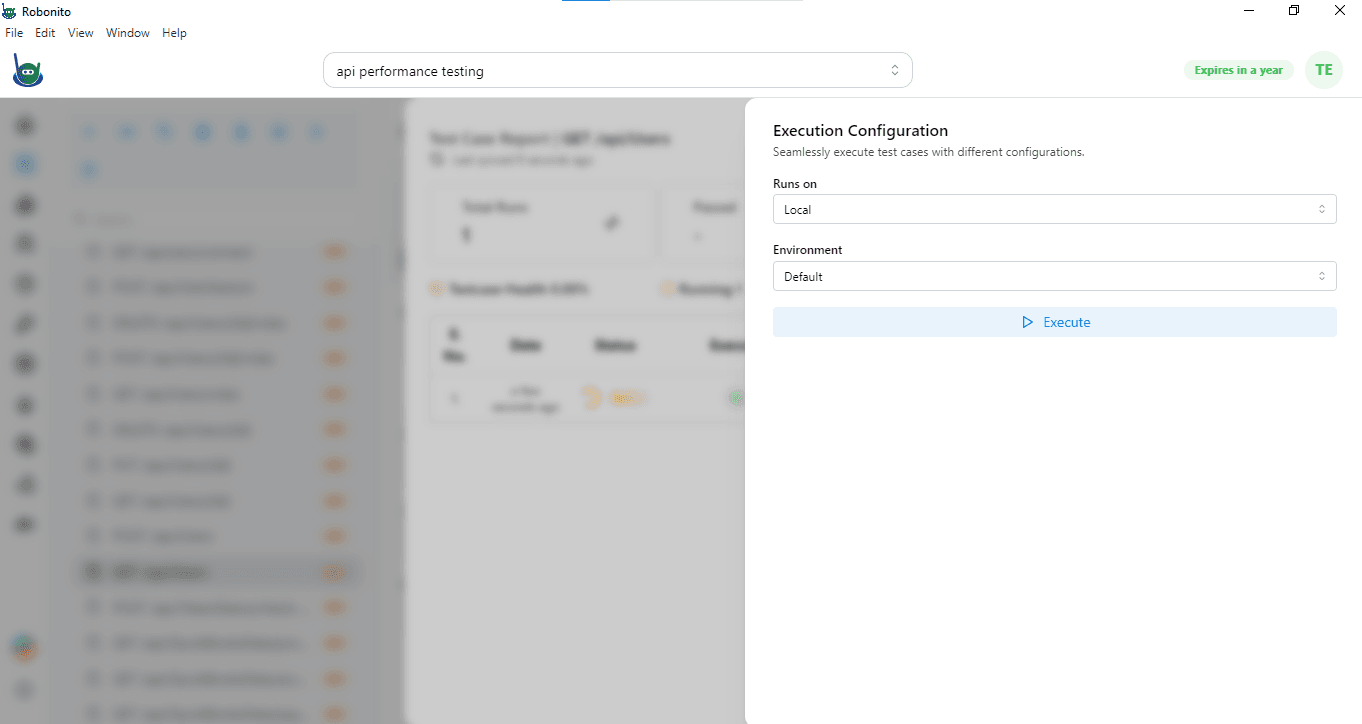

Running a local test will:
- Send API requests to the endpoint you selected
- Measure how the API responds under the load you set — for example, multiple users trying to log in at the same time.
- Record important metrics such as response time, requests per second, throughput, and error rate.
In Robonito, you can attach this token directly to the test case that needs it. This way, every request made during that test will automatically include the token in its header. It helps the server recognize the request as coming from an authorized user.
Adding the token at the test-case level also gives you flexibility. You can test both secured and unsecured APIs in the same project without changing global settings. This makes your performance testing setup clean, organized, and closer to how users actually interact with the system.
Running Performance Tests for an API
After importing the API test cases and adding tokens where needed, the next step is to run performance tests.
Running a test locally is usually the first step. It helps you check whether the API is working correctly and responding to requests in a basic environment. A local test also shows if the setup is correct and if the API can handle a few requests at a time.
However, real-world usage is different. Users do not access an API one by one. There may be hundreds, thousands, or even millions of users sending requests simultaneously. This is why performance testing with different load configurations is important.
Steps to Execute Performance Testing in Robonito
- Open Performance from the left sidebar in Robonito.
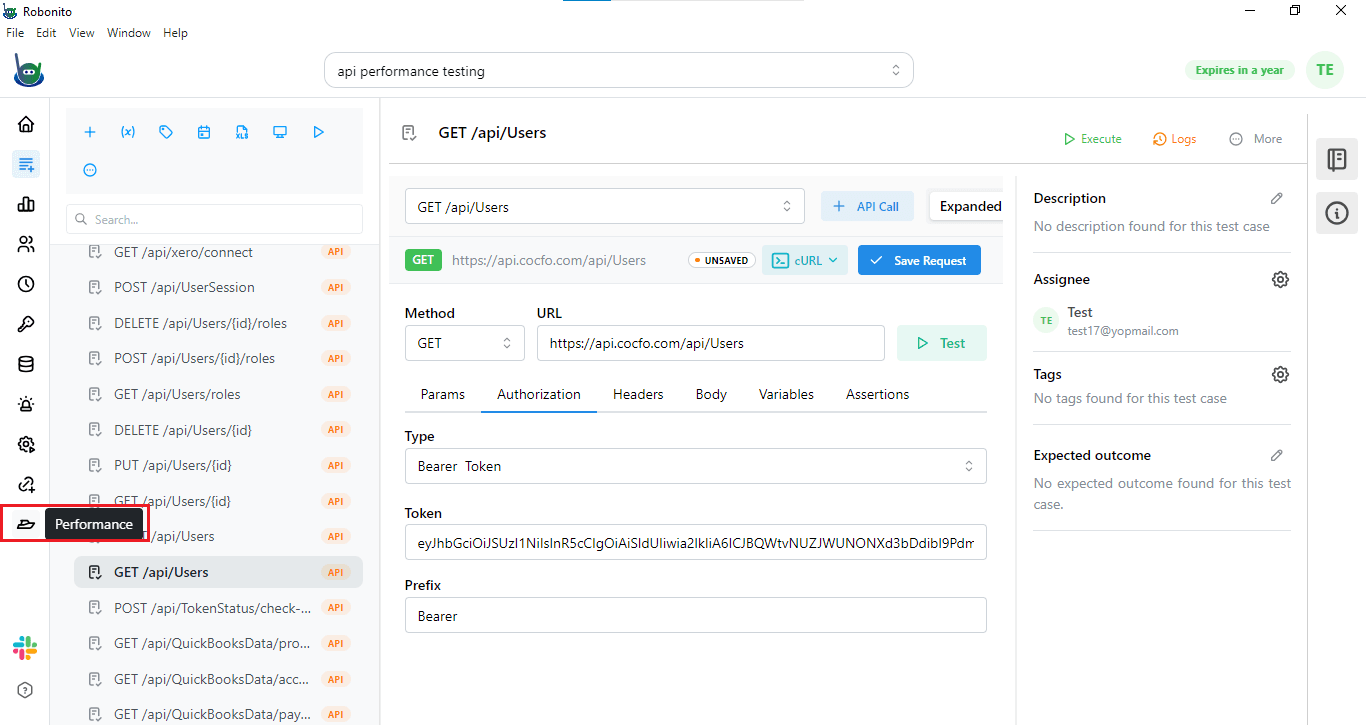
- Select the API test case you want to test for performance. In this example, we will use the API GET /api/users.
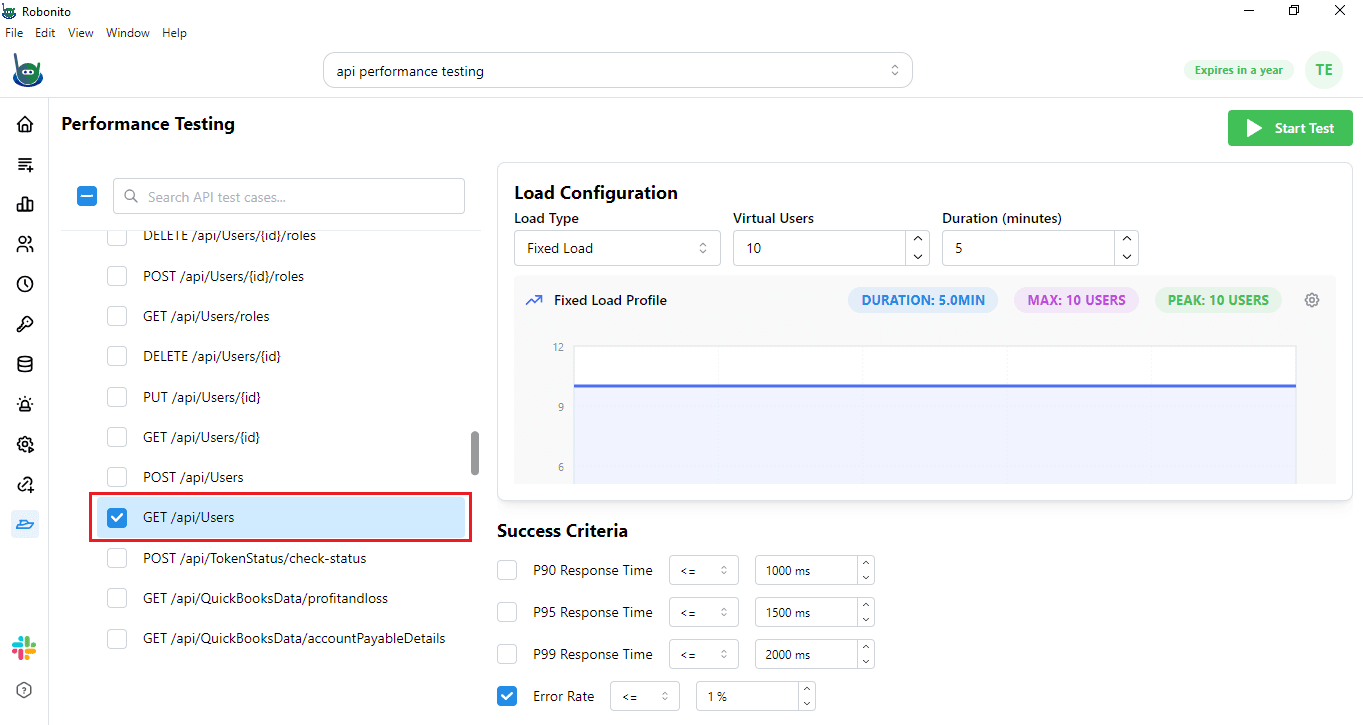
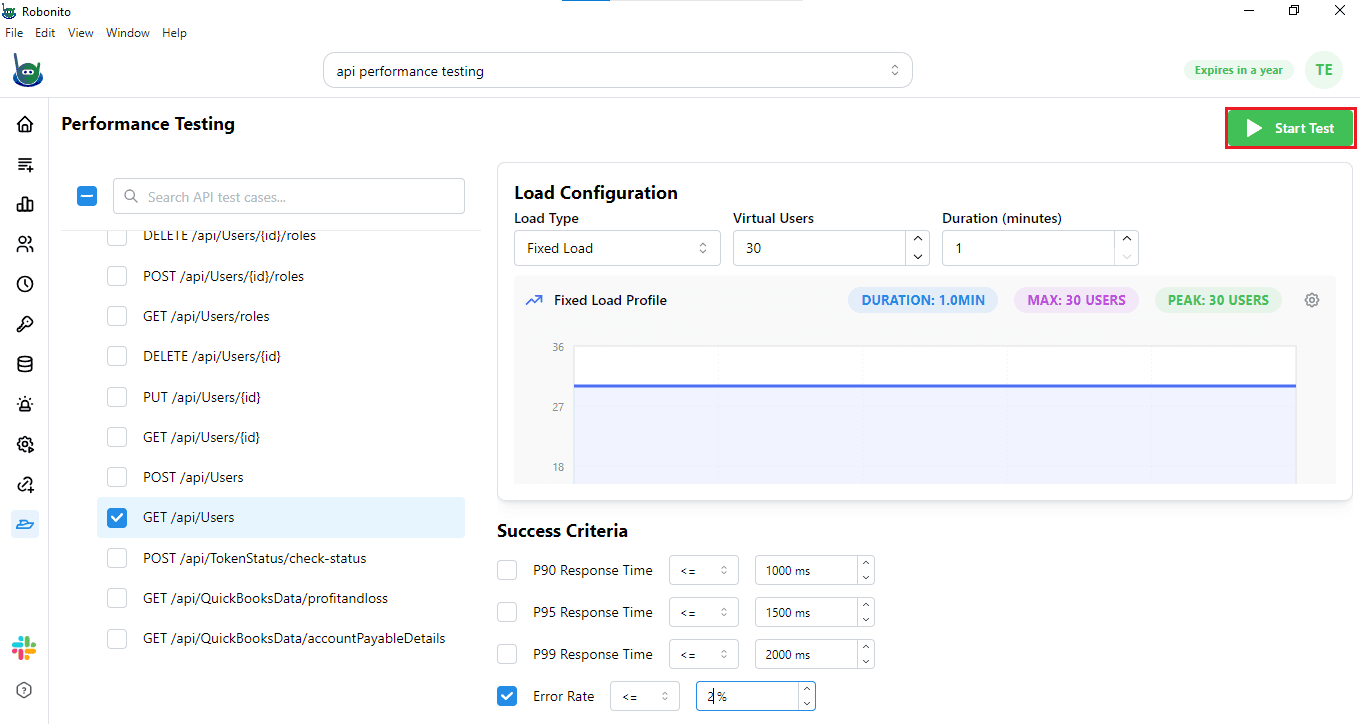
- After selecting the API, you will see the Load Configuration options.
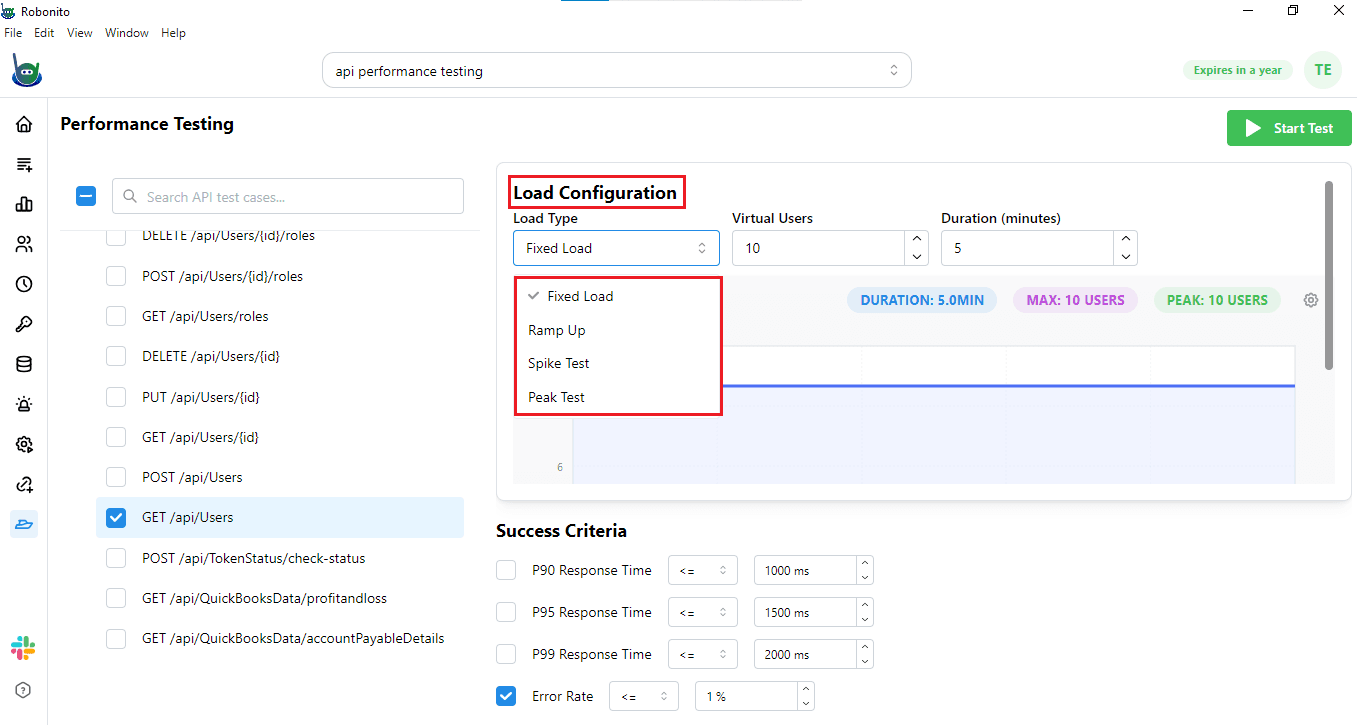
Load Configuration Types
Robonito allows you to choose from different types of load tests:
- Fixed Load: The API is tested with a constant number of users throughout the test.
- Ramp-Up Load: The number of users gradually increases over time to see how the API handles growing traffic.
- Spike Test: The API is suddenly hit with a large number of users to check how it responds to sudden bursts.
- Peak Test: The API is tested at maximum expected traffic for a period to see if it can handle sustained load.
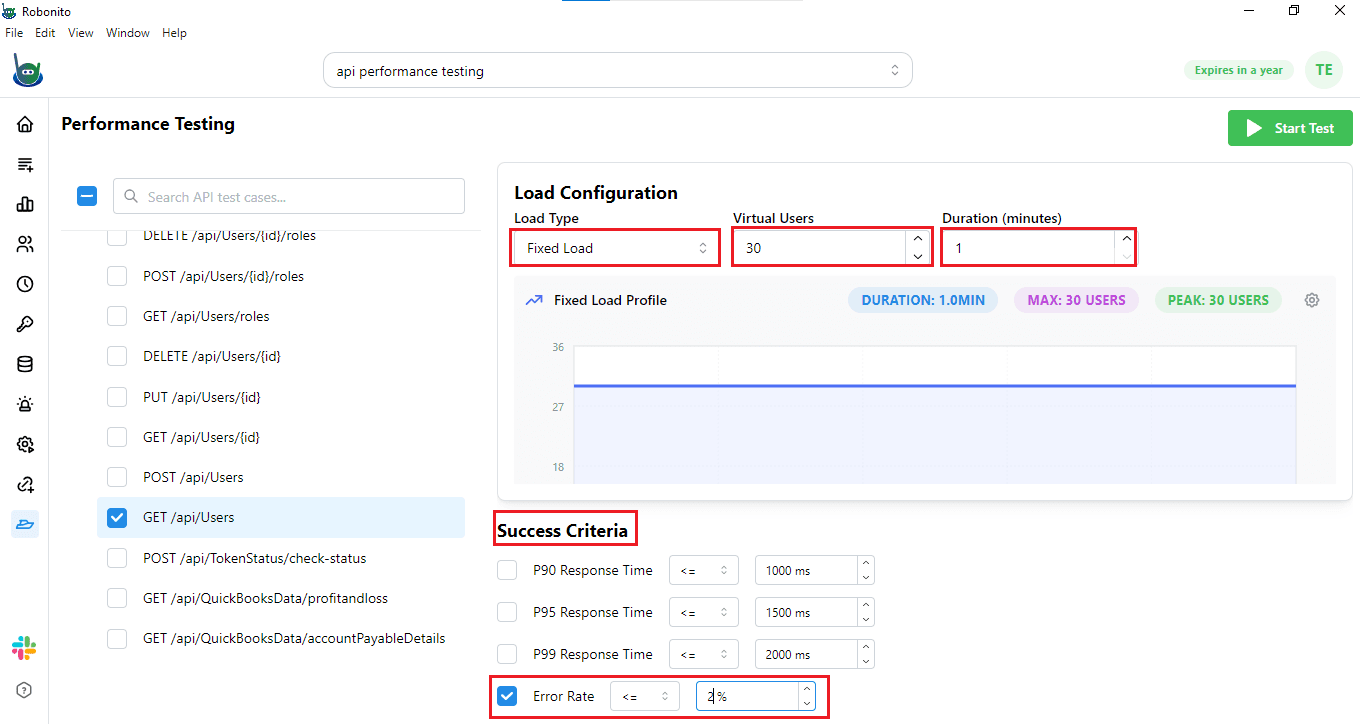
For this example, select Fixed Load. Then choose the number of virtual users. For example, select 30 users. Next, set the duration of the test. You can adjust the duration based on your testing requirements.
Note: For other load types, such as Ramp-Up, Spike Test, or Peak Test, you follow the same method:
- Select the load type you want.
- Set the number of virtual users.
- Define the duration or any other parameters required for that load type.
This approach ensures that your test runs with the correct traffic pattern and gives meaningful performance results for each scenario.
Setting Success Criteria
Below the load configuration, you will see the Success Criteria section. Here, you can define thresholds to measure API performance. Common criteria include:
- P90 Response: 90% of all requests should respond within a certain time. This ensures most users get fast responses.
- P95 Response: 95% of requests should respond within a set time. This is stricter than P90 and ensures almost all users get a fast experience.
- P99 Response: 99% of requests should respond within the expected time. This focuses on edge cases and ensures even rare requests are fast.
- Error Rate: The percentage of requests that fail or return an error. A low error rate shows reliable API performance.
For example, here we have set the error rate threshold to 2%.
Starting the Test
- After configuring the load and success criteria, click Start Test.
Robonito will initialize the performance test and open a new console showing the API performance monitor.
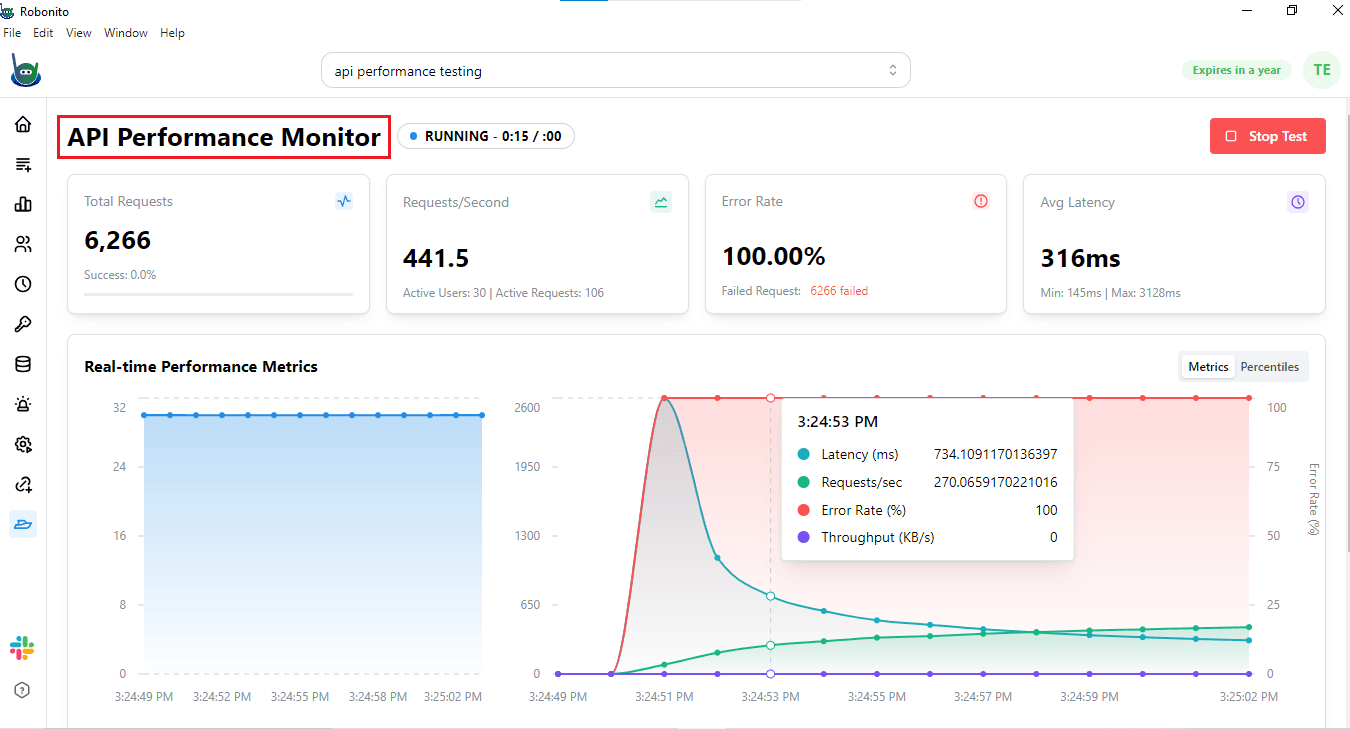
Here, you will see real-time performance metrics displayed via graphs, which provide detailed information on:
- Latency: The response time for API requests.
- Requests: The number of API calls being processed.
- Error Rate: The percentage of failed requests.
- Throughput: The number of requests the API can handle per second.
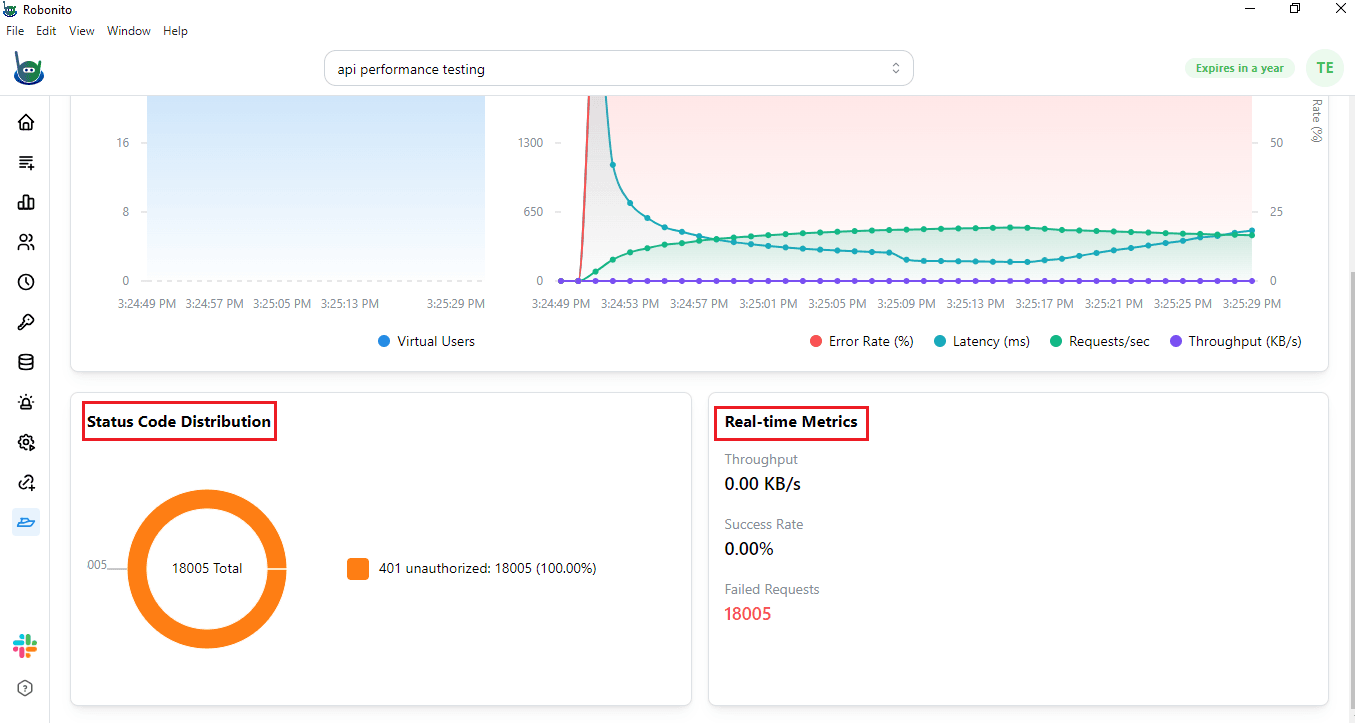
In addition, you will see the Status Code Distribution, which provides details on:
- Total number of users sending requests.
- Number of unauthorized users or failed requests due to missing or invalid tokens.
Real-Time Metrics
In addition to graphs, this section gives you live numbers for:
- Throughput: Requests processed per second.
- Success Rate: Percentage of requests completed successfully.
- Failed Requests: Requests that did not succeed or returned an error.
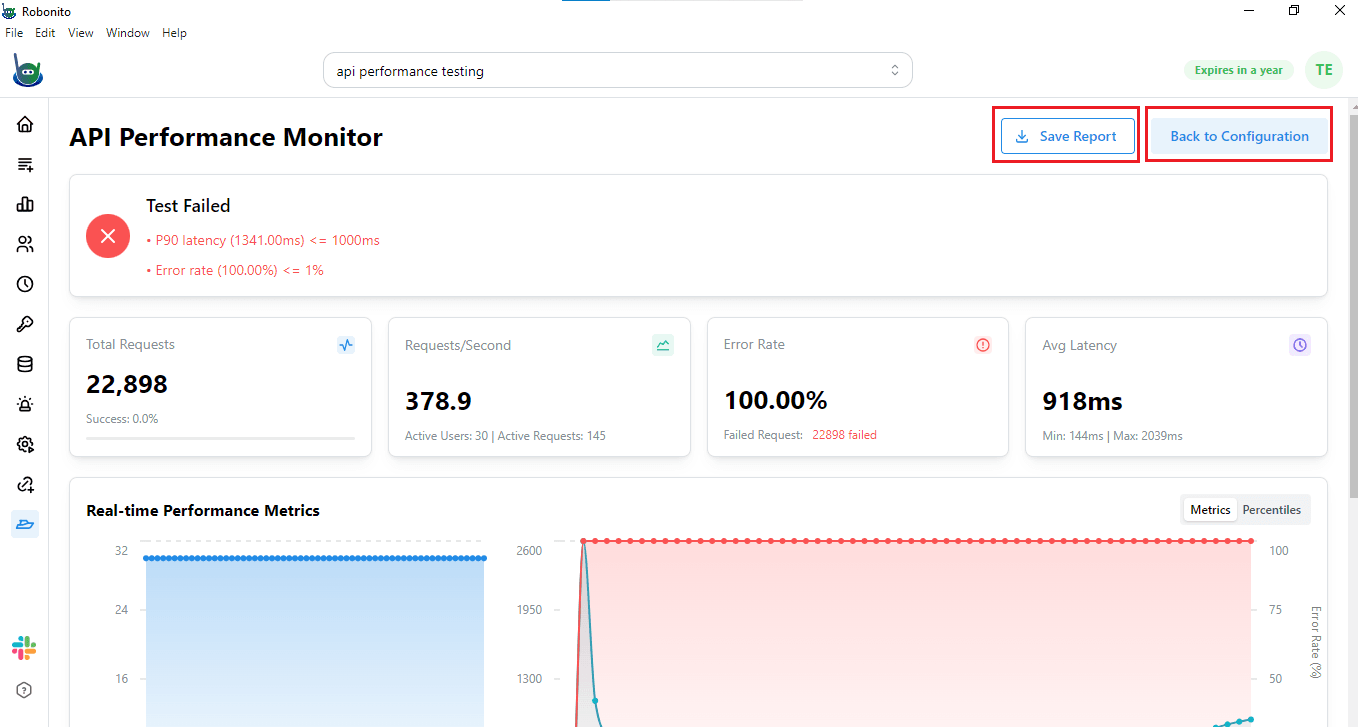
After the Test
When the test is complete, you can save the performance report from the top-right corner. You can also return to the configuration screen to run tests for another API. Saving the report allows you to analyze results later and compare performance across different endpoints or test conditions.
Why Choose Robonito for API Performance Testing
Robonito makes API performance testing simple, fast, and accurate, even if you are not a technical expert. With Robonito, you can:
- Import APIs directly from Swagger/OpenAPI without manual setup.
- Add tokens to secured APIs easily, ensuring realistic testing.
- Configure different load types like fixed load, ramp-up, spike, and peak tests.
- Monitor real-time performance metrics including latency, throughput, success rate, and error rate.
- Analyze status code distribution to quickly identify unauthorized or failed requests.
Robonito gives you everything you need to test APIs like a pro, while keeping the interface simple and intuitive. You can test multiple endpoints, monitor performance live, and generate detailed reports—all from one platform.
Get Started Today
Take the first step toward faster and smarter API testing. Sign up for Robonito today and start running performance tests with ease.