Vibe Testing with Gemini, OpenAI, and Robonito: From Connection to AI-Driven Test Automation
Testing can be challenging at the start. You need to write automation scripts, debug failures, and update tests whenever the application changes. That is why R...

With Vibe Testing, you do not need to write long test scripts. All you need to do is tell Robonito what you want to test, and it works with Gemini to turn your words into test cases. It feels like having a helper who understands you and takes care of the technical work.
The best part? Robonito also gives you an AI assistant. Imagine you run a test and something breaks. Instead of scratching your head over logs, the assistant explains what went wrong in simple words and even suggests what you can do next.
In this guide, you will see how to connect Gemini with Robonito, make your first AI test case, and use the assistant when you need help. If you are just starting, do not worry. Everything is written in simple words so you can understand and follow step by step.
Connecting Gemini and OpenAI with Robonito
Before you can start Vibe Testing in Robonito, the first thing you need to do is connect it with Google’s Gemini AI model. Think of this step as giving Robonito the “brains” it needs to understand your instructions and create intelligent test cases for you. Without this connection, you cannot use the AI features like generating tests or asking the assistant for help.
To make this connection, you need a Google API key. This key works like a password that allows Robonito to communicate safely with Gemini. Don’t worry—it’s easy to get, and you only need to do it once.
How to get your Google API key
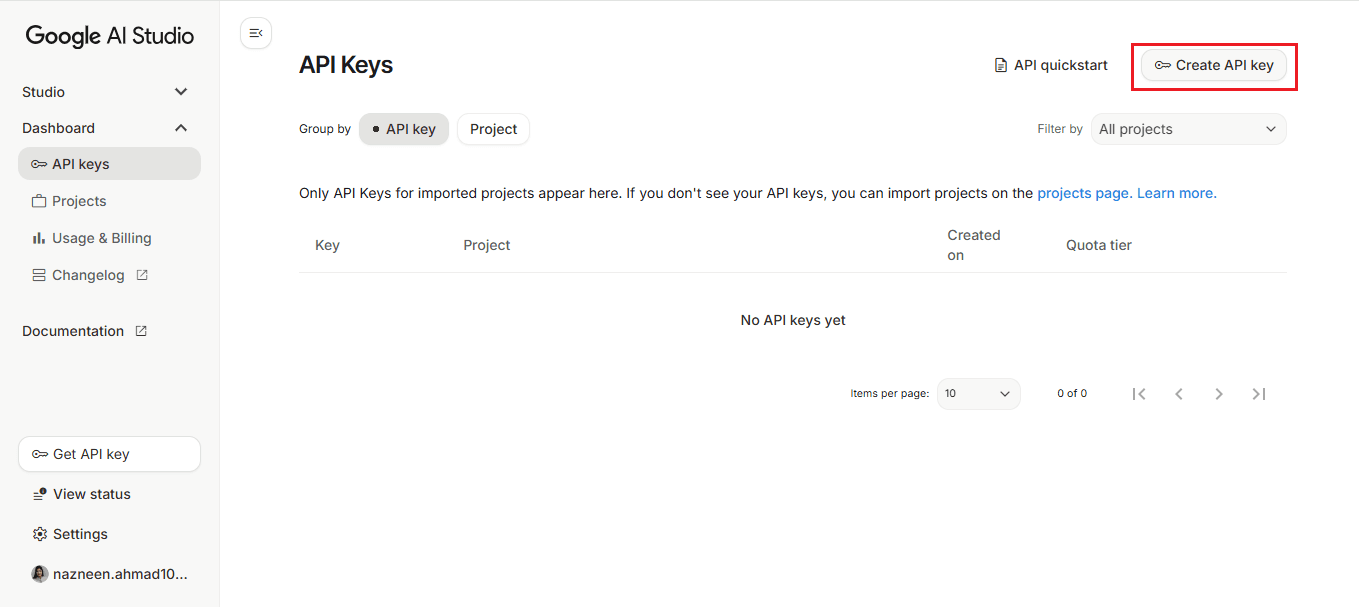
- Open Google AI Studio in Google Chrome. Once it loads, look at the left sidebar. Scroll down to the bottom, and you will find an option called “Get API key.” This is where you start the process.

- When you click it, a new console will appear. On the right-hand side, there is a button labeled “Create API key.” Click on this button to proceed.
- A small pop-up window will open, titled “Create API key.” Here, you need to choose “Create API key in existing project.” If you do not have any new projects, you can create new ones there.
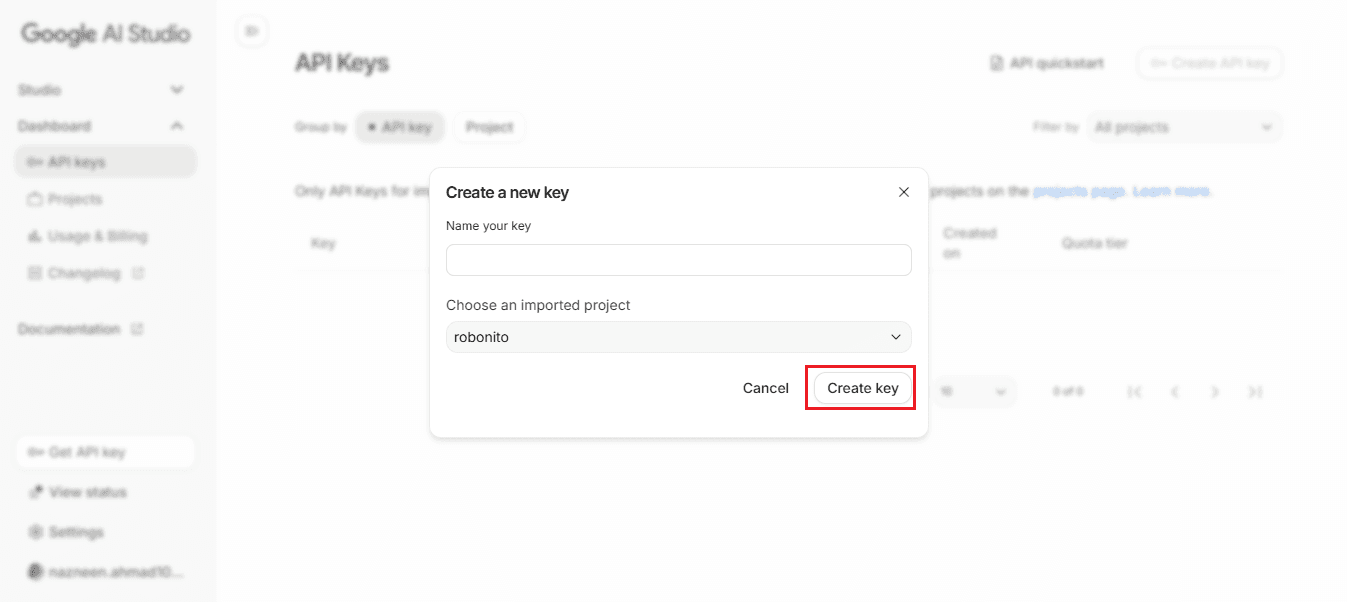
- This tells Google to generate a key linked to your Google account that can be used safely with Robonito. You can now copy the Google key from here.
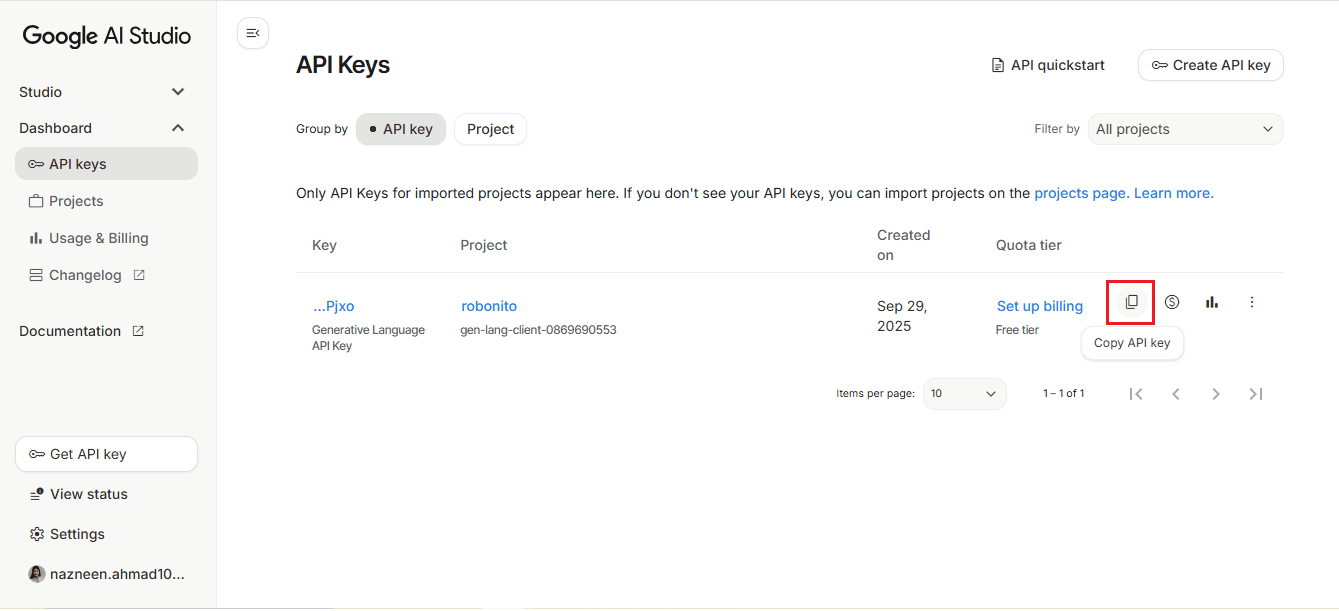
- Once the key is created, copy it carefully. This is the key to connecting Robonito with Gemini. Keep it ready, as you will need it for the next steps.
How to Get Your OpenAI API Key
Getting your OpenAI key is very simple. Just follow these steps one by one.
Step 1: Search for the OpenAI API key page
Open Google and type “OpenAI API key” in the search bar. From the results, click on the option that says “Create an OpenAI API key.” This will take you directly to the OpenAI website.
Step 2: Log in to your account
You must be logged in to your OpenAI account to create a key. This can be your personal or company account. If you are not logged in, you will see a login page. Enter your email and password to continue.
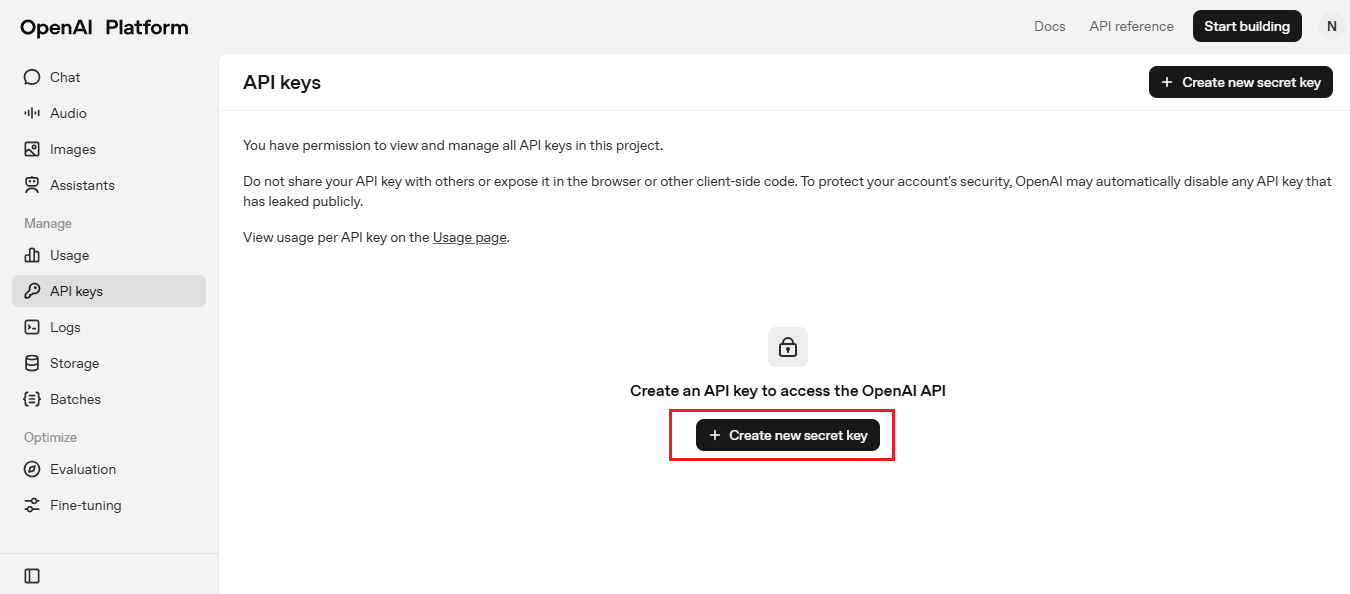
Step 3: Create a new secret key
Once logged in, you will land on the API keys page. Here, click on the button that says “Create new secret key.”
Step 4: Name your key
A small pop-up will appear asking you for the key name and project name. You can give any name of your choice. For example, write “Robonito Key” so that you remember why you created it.
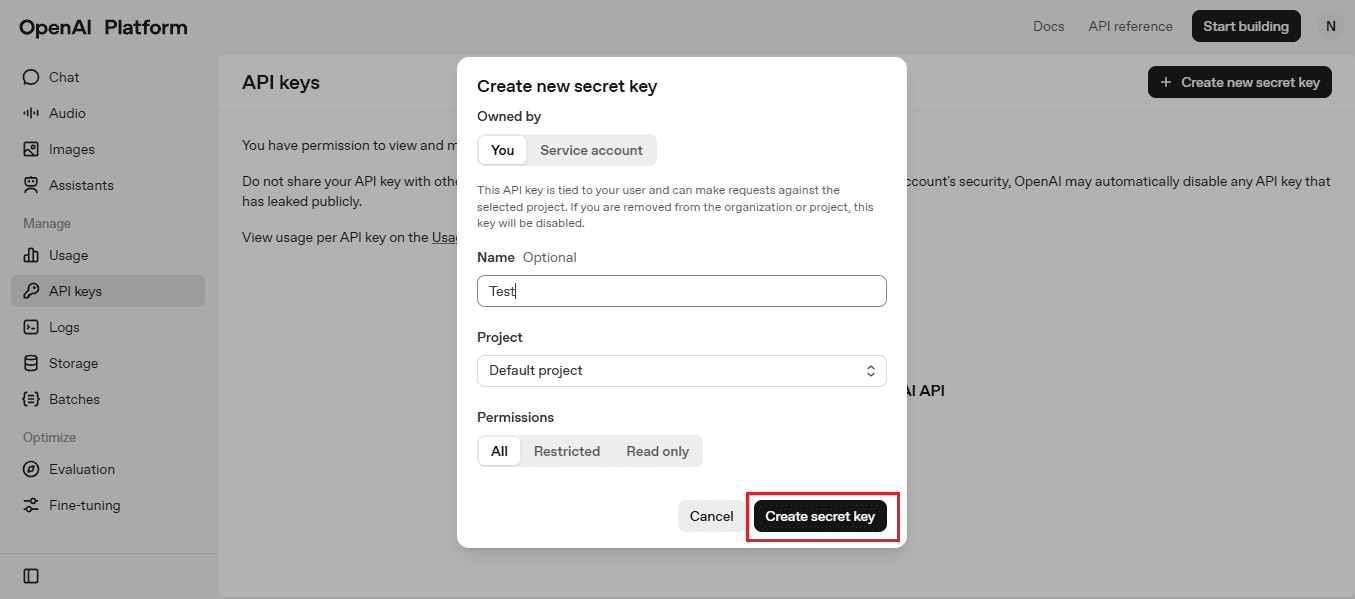
Step 5: Copy your key
After you click “Create secret key,” OpenAI will generate a unique key for you. Copy this key and keep it safe.
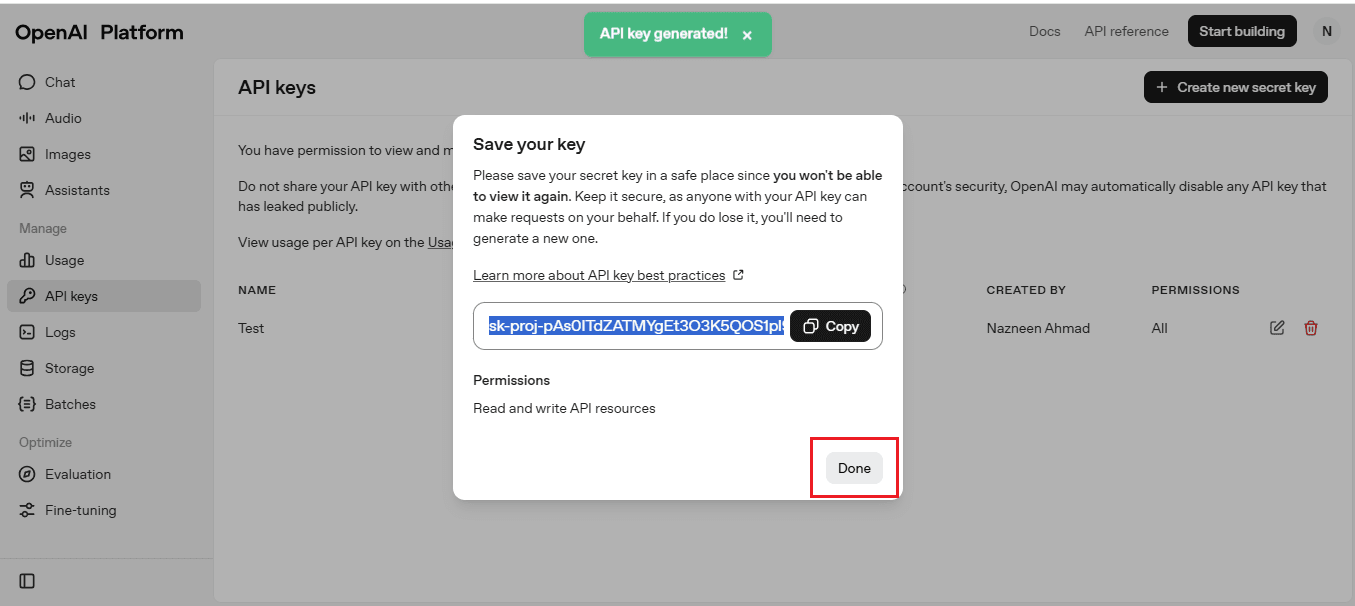
Now your OpenAI key is ready, and you can paste it inside Robonito to connect and run your tests.
Steps to connect Robonito with Gemini and OpenAI
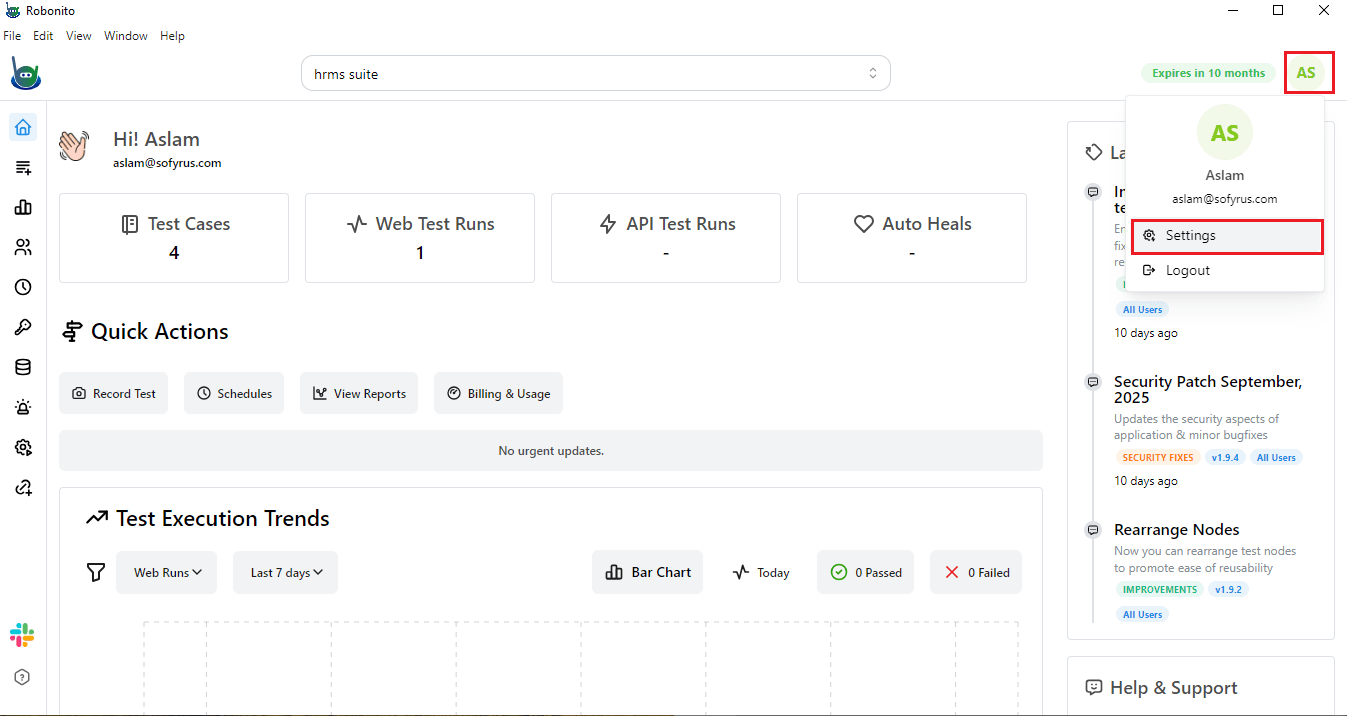
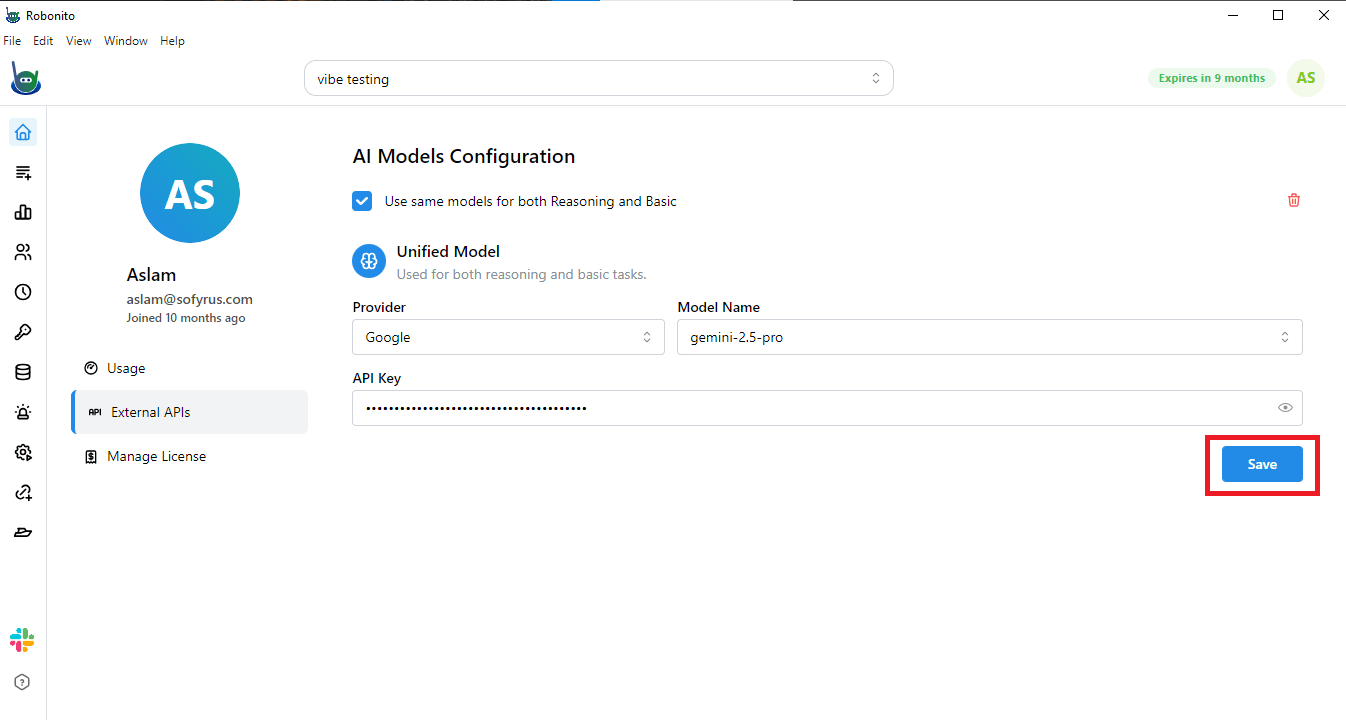
- Log in to your Robonito dashboard. Look at the top-right corner and click your profile picture. A menu will appear, and from there, select Settings.
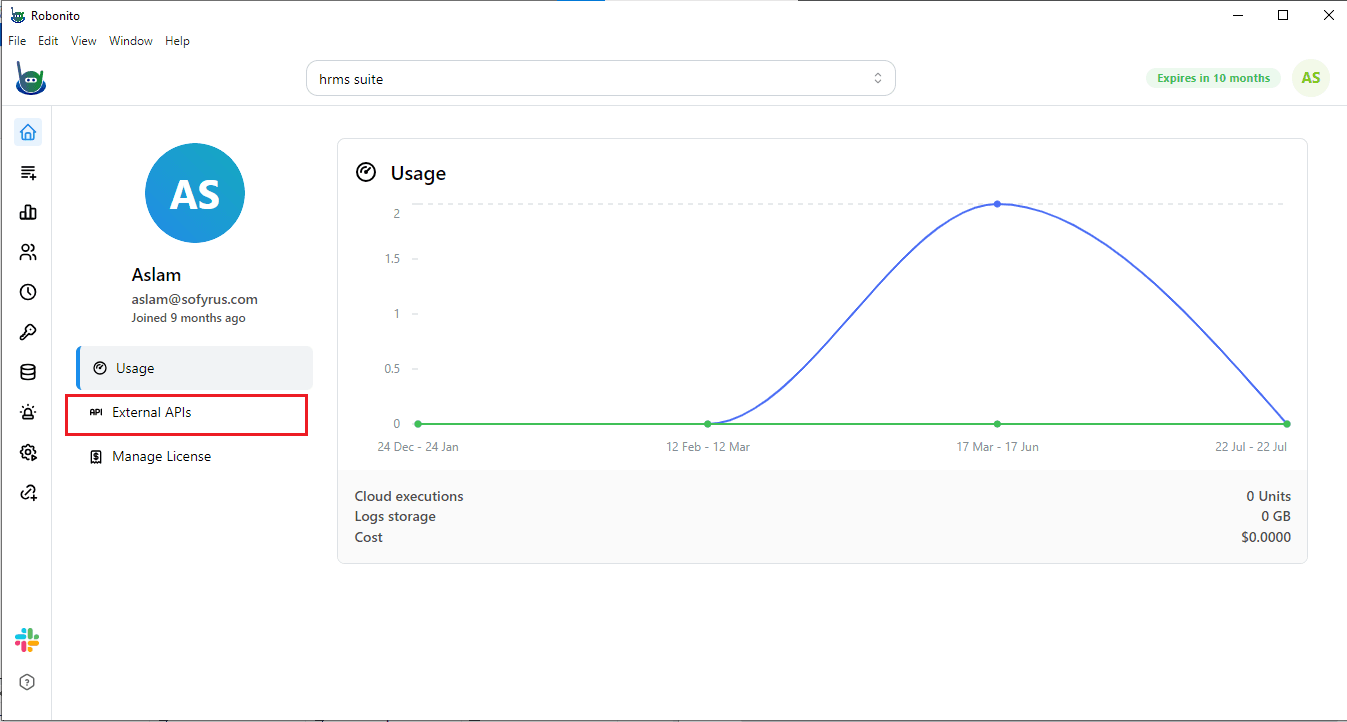
- In the Settings page, look at the left-hand sidebar and click on External API. This section is where Robonito allows you to connect to outside services like Gemini.
- You will see the AI Model Configuration console. Here, you have the option to use the same model for both Reasoning and Basic tasks—simply check the corresponding box.
Next, you need to select a provider. The available options are OpenAI, Google, and Anthropic.
- To use Google Gemini, select Google.
- To use OpenAI, select OpenAI. Under Model Name, choose the specific model you want to use. Finally, enter your API Key.
- If you are using Google Gemini, enter your Google API key.
- If you are using OpenAI, enter your OpenAI API key.
Once done, click Save to apply your configuration.
Once these steps are done, Robonito is successfully connected to Gemini or OpenAI based on your choice.
This means your platform is now ready to generate AI-powered test cases and use the AI assistant to help explain errors, suggest fixes, and improve your tests.
By connecting to Gemini, you are essentially giving Robonito the ability to think for you, so you can spend more time focusing on testing logic instead of writing every test manually.
Using Robonito’s AI Assistant Powered by Gemini and OpenAI
Let’s go step by step on how to use Robonito to run your tests. Don’t worry if this is your first time, as you will get it quickly.
Step 1: Generate Your Test Case
Before you can start testing, you need a test case ready. Think of a test case as a plan for what you want Robonito to do on the website. If you are not sure how to create one, just check the linked guide. Once your test case is ready, you can go to the next step.
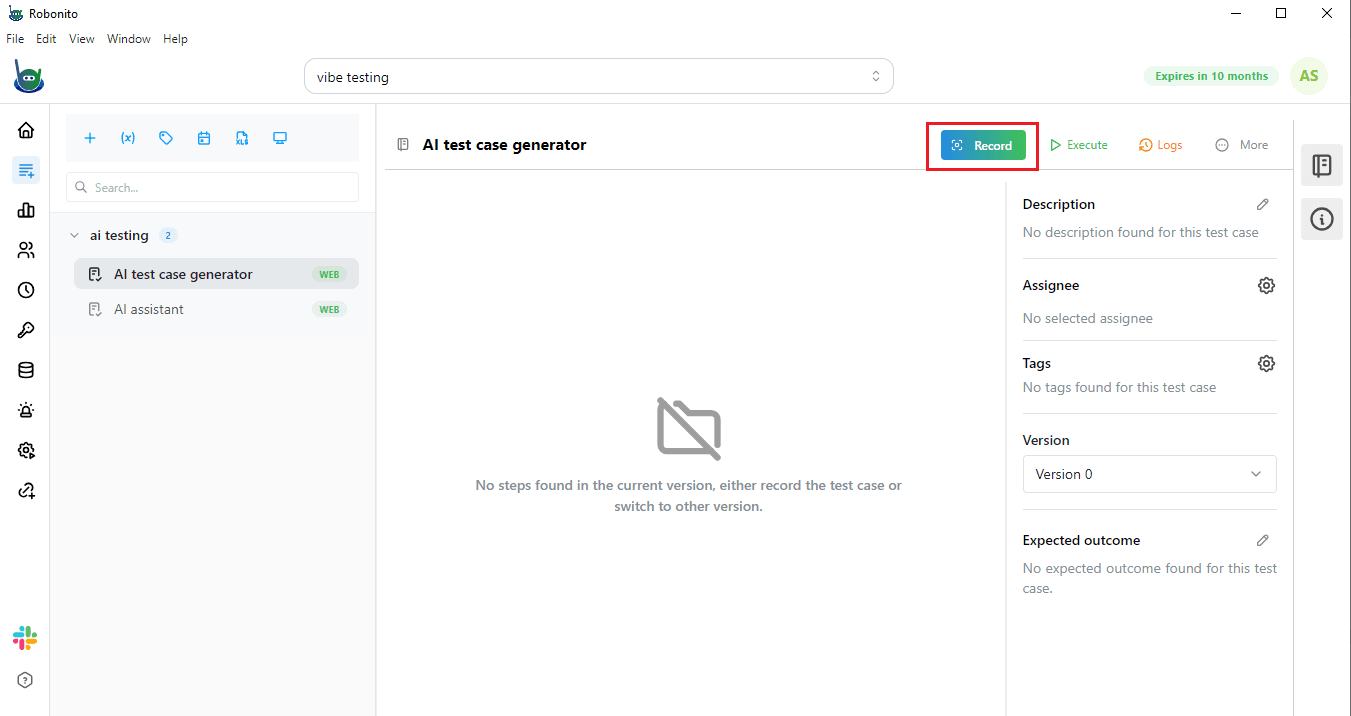
Step 2: Start Recording
Go to the top-right corner of Robonito and click Record.

A small console will open where you can enter the website address you want to test.
https://opensource-demo.orangehrmlive.com/web/index.php/auth/login
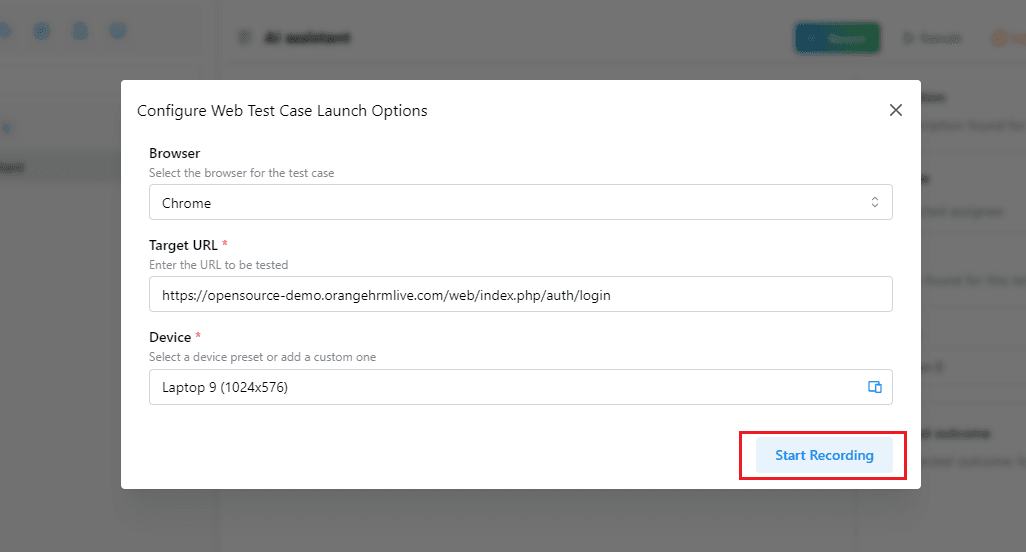
Click Start Recording.
The website will open, and Robonito will start tracking all the actions you perform. This is important because it records every step so it can repeat them automatically later.
Step 3: Open the AI Assistant
On the right-hand side of Robonito, you will see three options:
- Automation Tools
- AI Assistant
- AI Test Case Generator
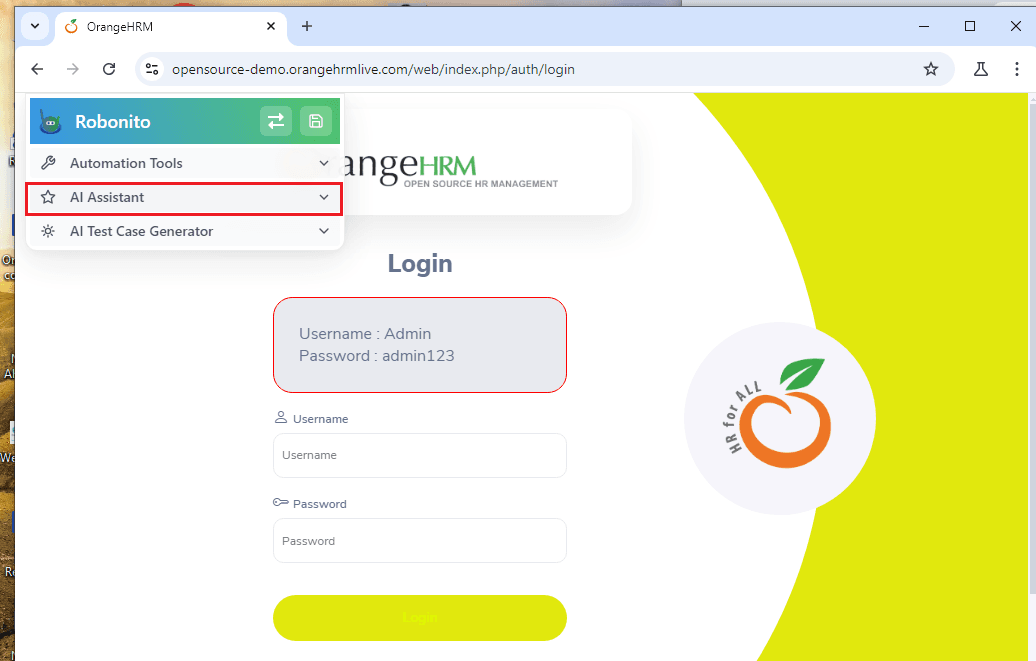
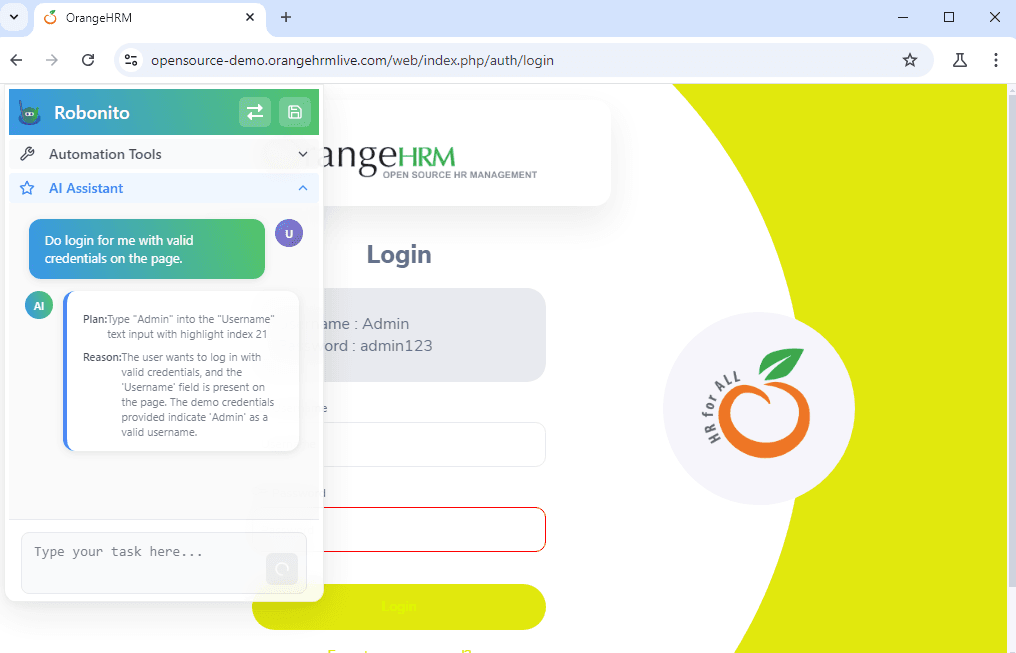
Click on AI Assistant. This opens a smart AI bot that asks you to “Type your task here.”
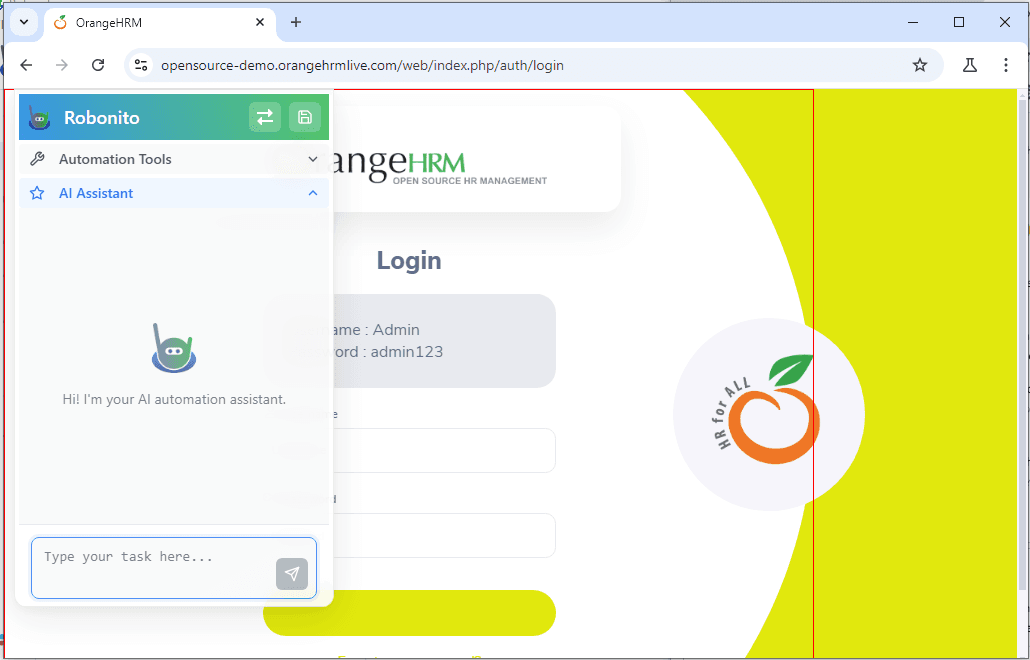
Step 4: Give Commands to the AI Bot
Here comes the fun part! You can tell the AI exactly what you want it to do on the website. For example, type: Do login for me with valid credentials on the page.
Then press Enter. The AI bot will follow your command and do everything automatically. It will enter the username and password and log in for you, so you do not have to do anything.
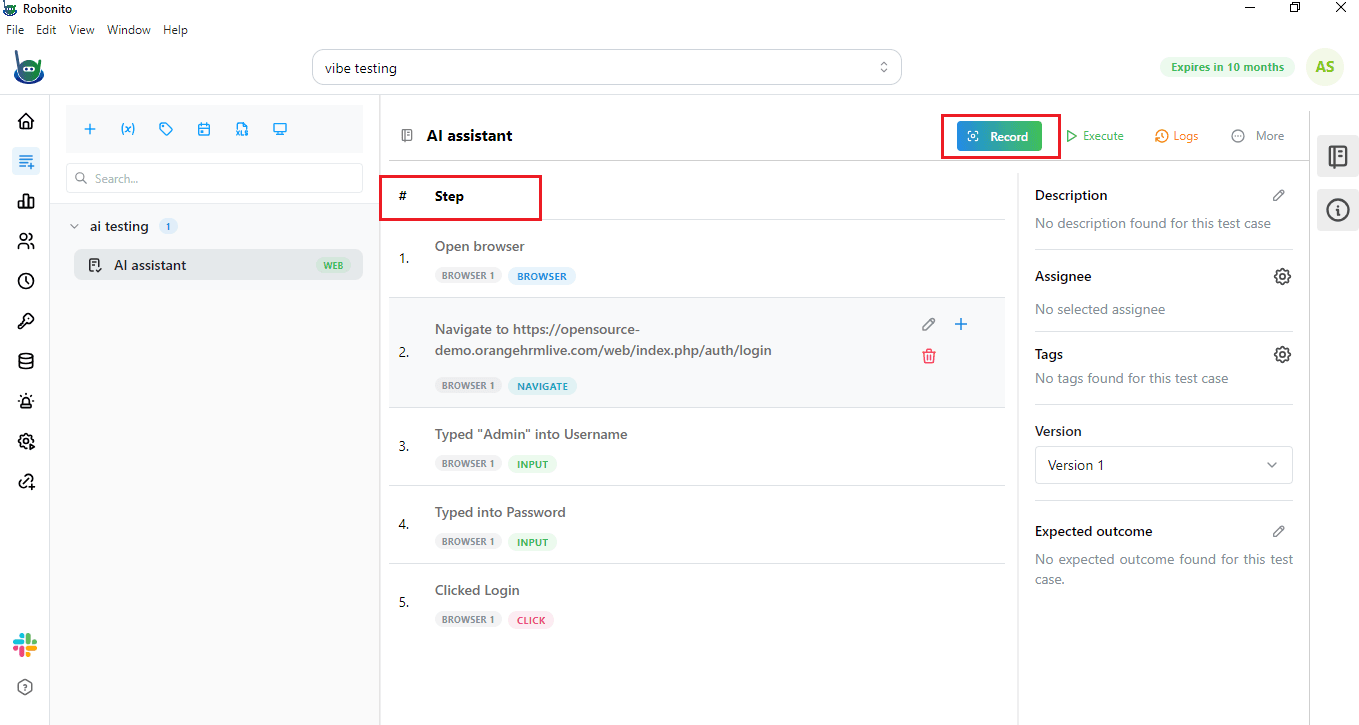
Step 5: Save Your Test
After the AI has completed your actions, click Save in the Robonito bar. This will store your test and show you all the steps that were created. You can review them to make sure everything looks right.

Step 6: Execute the Test
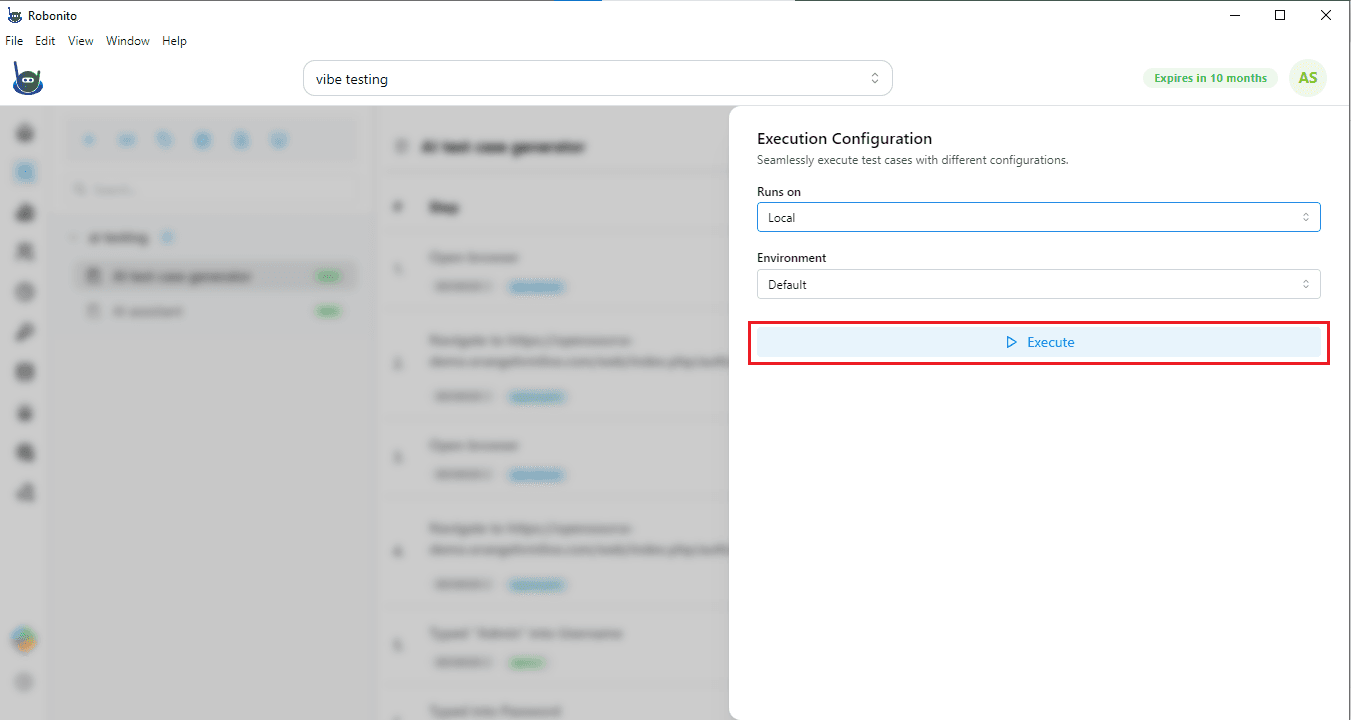
Now it is time to run your test. You can see the steps that were executed in the test process. Now you can run the test. For this, click the Execute button on the right.
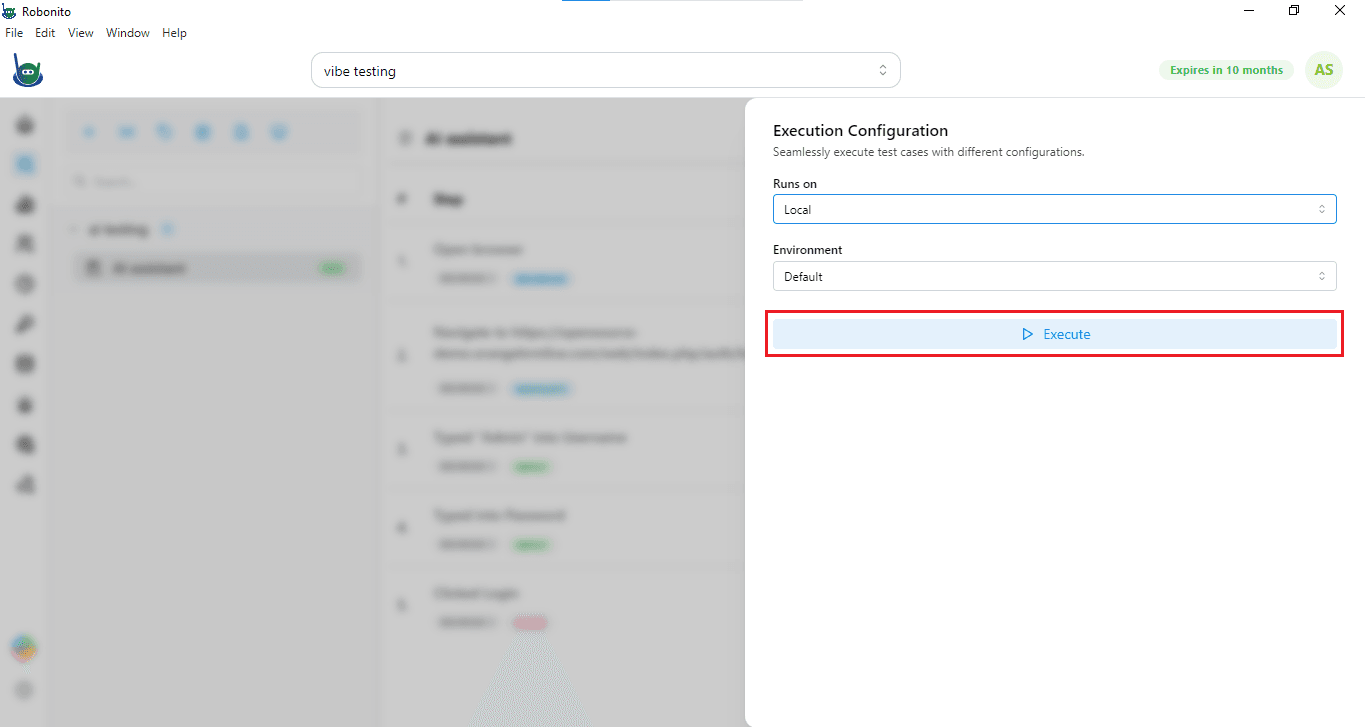
A console window will open, and here you can pick how you want to run the test. Take your time to select the options that suit your testing needs. You can either run it locally on your machine or on the cloud.
For example, select Local and click Execute. Robonito will now follow the recorded steps and run the test automatically.
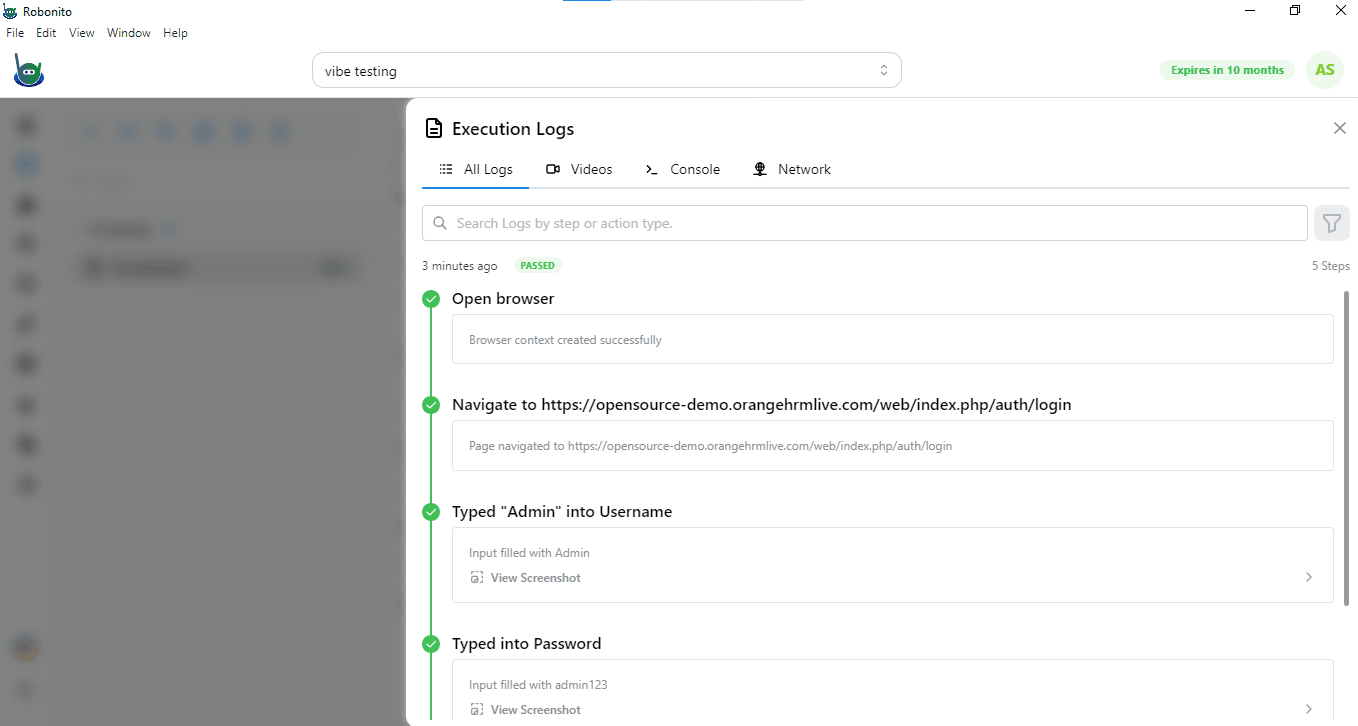
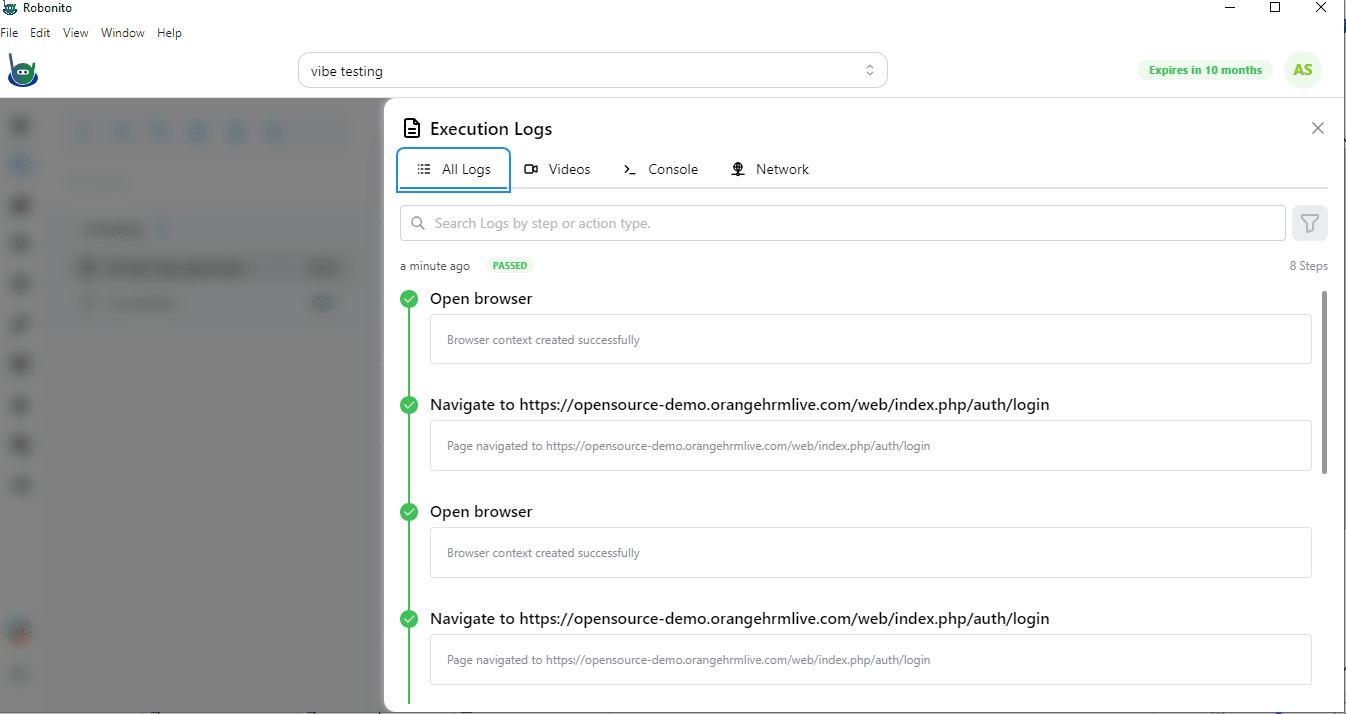
You can also see the test reports in real-time, showing which steps passed and if there were any issues.
AI Test Case Generation with Gemini and OpenAI in Robonito
Step 1: Add a Test Case and URL
Start by creating a new test case inside your test suite. Along with that, add the website URL you want to test.
For example, you can use this demo login page: https://opensource-demo.orangehrmlive.com/web/index.php/auth/login
Step 2: Start Recording
Once your test case and URL are ready, click on Record. Then click on Start Recording. As soon as you do this, the website you added will open in a new browser window as directed in the above steps.
Step 3: Open AI Test Case Generator
On the right-hand side of this new window, you will see three options:
- Automation Tools
- AI Assistant
- AI Test Case Generator Here, you need to click on AI Test Case Generator. After that, press the Generate Test Case button.
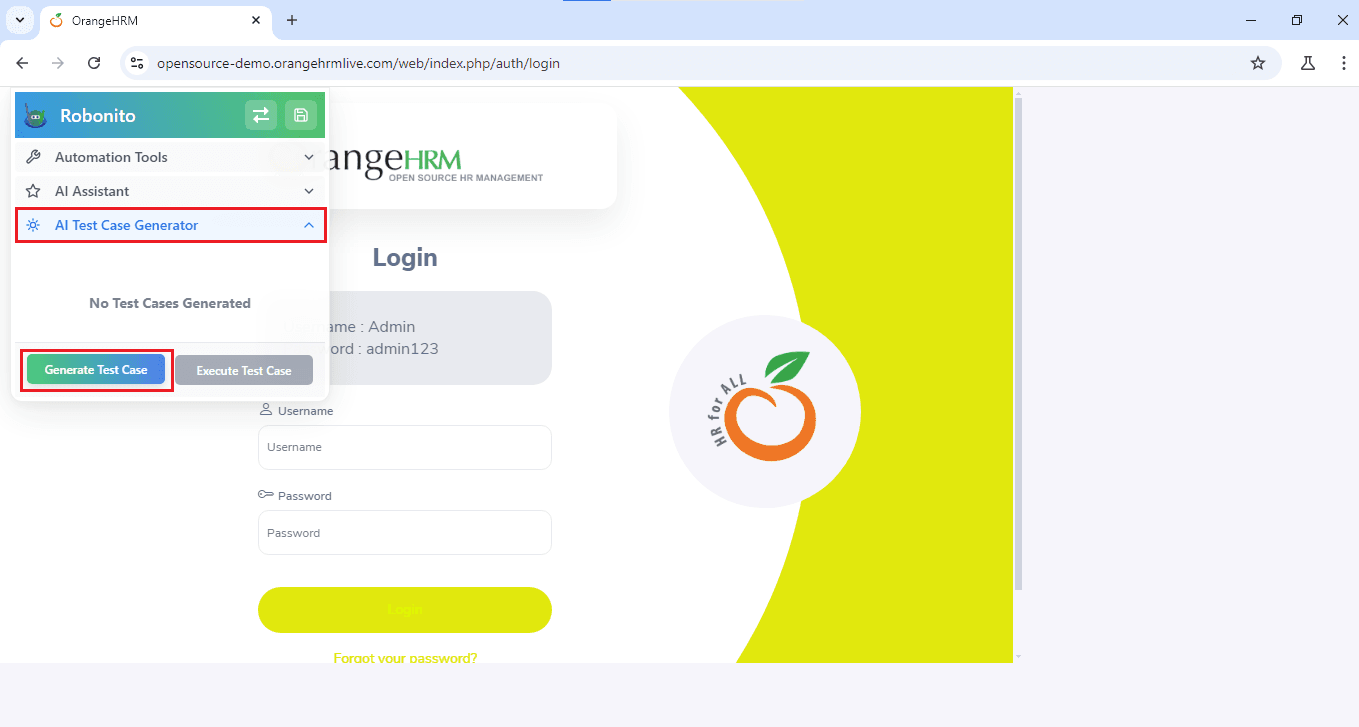
Step 4: Let AI Create Test Cases
Now wait for a few seconds. Robonito will automatically create different test cases for the website you added. For example, for the demo login page, you might see a test case like “Verify credential with valid username and password.”
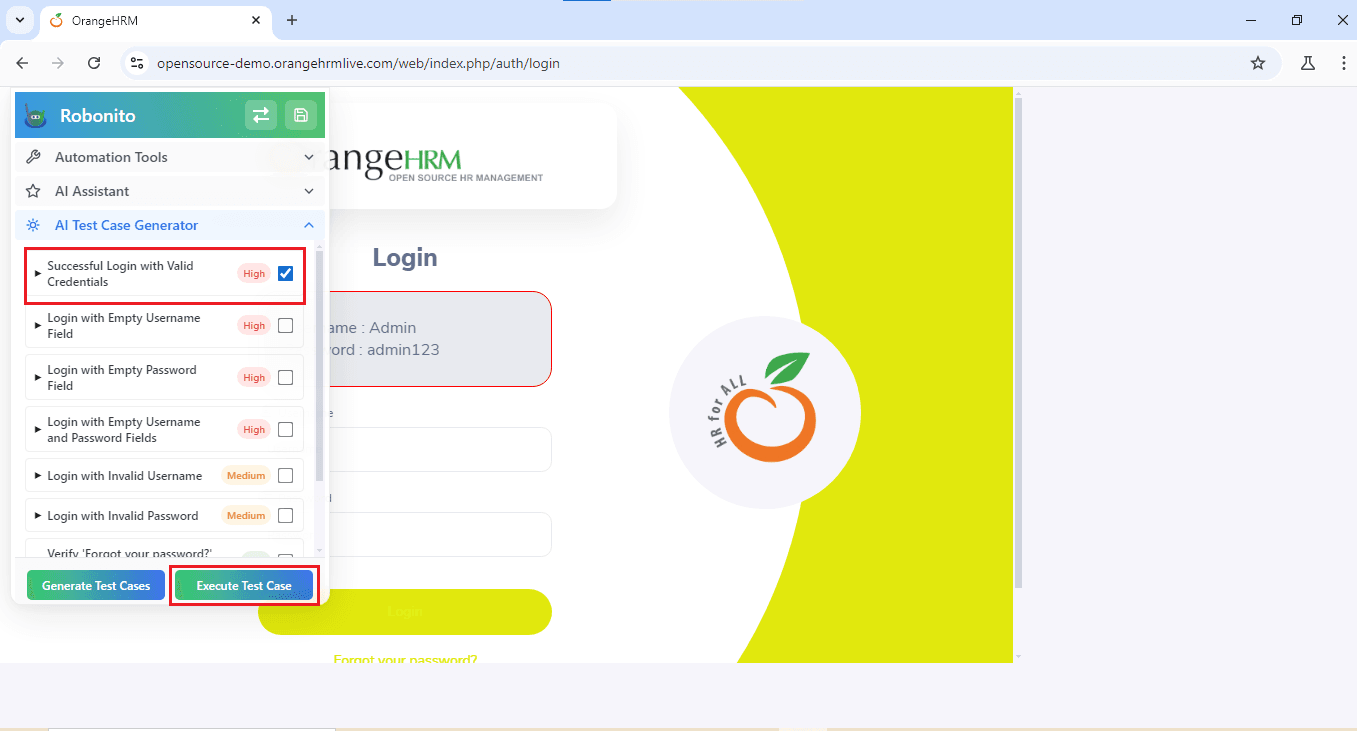
Step 5: Select and Run a Test Case
From the generated test cases, select the one you want to execute. Suppose you choose the login test case with valid credentials. Just click on Execute Test Cases.
Robonito will now automatically enter the username and password, log in to the website, and complete the steps—without you typing anything.
Step 6: Save the Test Case
After execution is done, do not forget to save the test case. Once you save, you will be redirected to the console view, where you can see all the steps that were carried out.
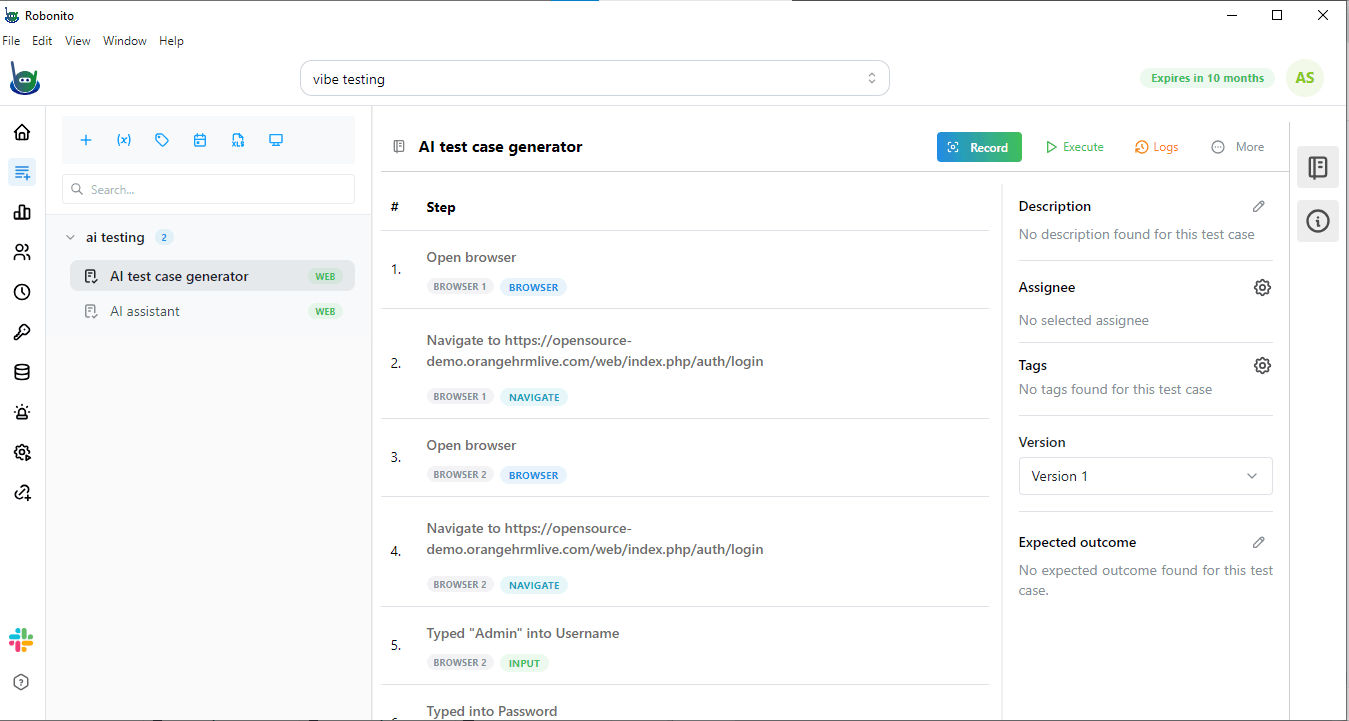
Step 7: Execute Locally and Check Results
Finally, from the console, click on Execute if you want to run the test locally.
After the run finishes, you can see the complete test results and reports on your screen.
Join Robonito and Simplify Testing
Sign up for Robonito today and experience how simple testing can be. With AI-powered test case generation, you can start creating and running your first tests in just a few minutes.